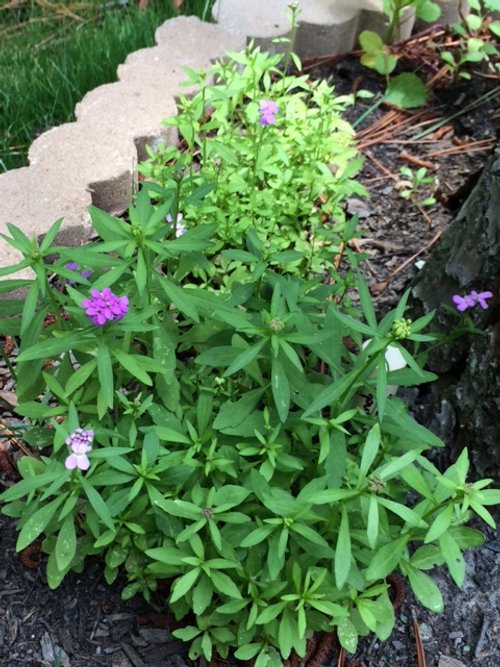
I think of my garden as a collaborative dance with nature and I am always looking for ways to be a better dance partner.My garden is exactly one square foot smaller than the maximum allowed in the HOA rules so I was loathe to use valuable garden space for non-edible plants. Instead I decided to make flower beds around the pines and larger sweet gumballs that occupy the back 1/3 of my yard.When selecting what flowers to grow, I tried to stick with varieties that are native to this area to be low maintenance, have something blooming from spring through fall and hopefully be just like mom's cooking to the wild pollinators.Lucky for me this includes Lily of the Valley and Balsam (below, pink) with Canterbury Bells and Candytuft (below, purple) being naturalized.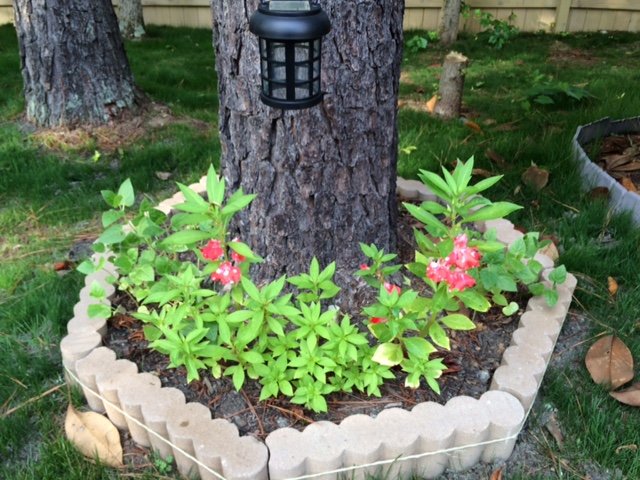
 Despite not being native, I couldn't resist Mother of Pearl Poppys (below) and Four O' Clock Sweets.
 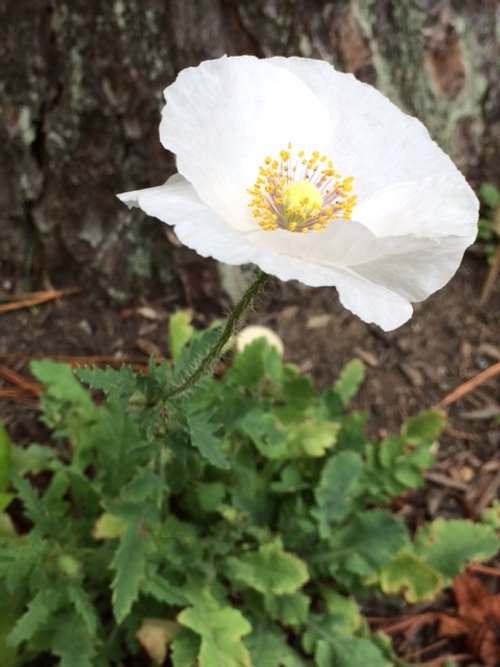 And in spring a colleague gifted me with some pink Calla Lily bulbs.
 I also have a Malope mix, 3 varieties of sunflowers, Blue Zebra Primrose and Zenias growing.I am trying to encourage nature by giving it what it needs, then mostly staying out of the way while it grows delicious food.
Spring Garden to Summer Garden
It is June and the turning from the spring garden to the summer garden is well underway. I am quickly picking the last of my lettuce before it bolts meanwhile the edamame is flowering.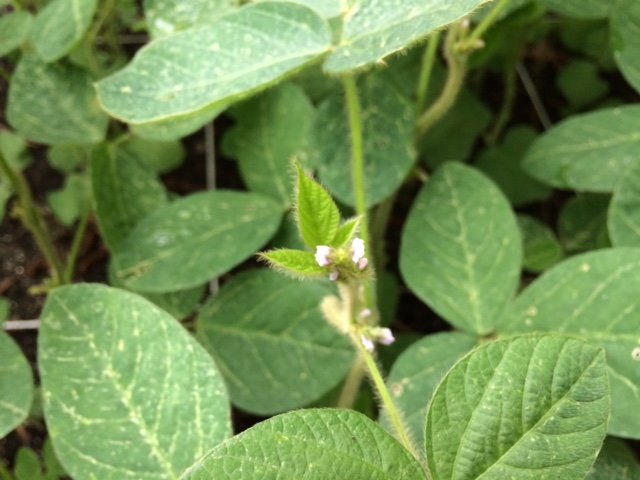 The sugar snap peas, snow peas and strawberries are in full swing while the blueberries are just beginning to take on a purple hue.
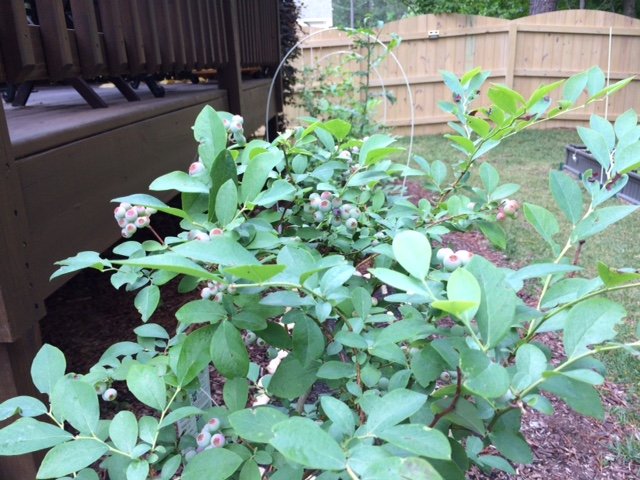 The serrano peppers are fruiting and flowering at the same time.
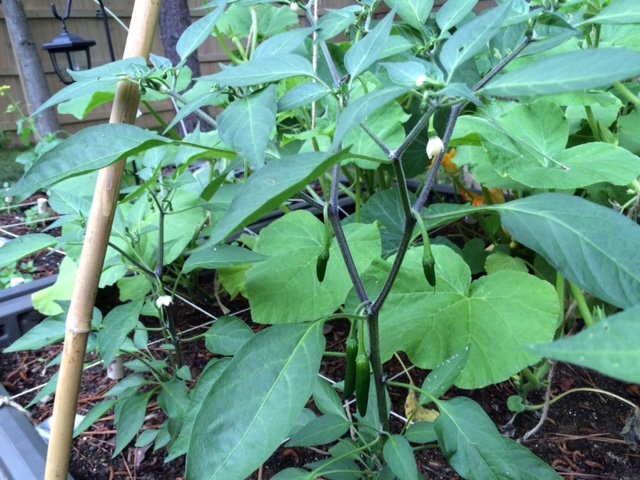 I am pleased with how many spears my first year asparagus crowns are throwing up. The shoots are tall and flopsy when they grow out so they are staked for support during this first unmolested this year. I hope to be able to sample a couple of spears next year and in 2017 they should be healthy, happy crowns I can harvest from.
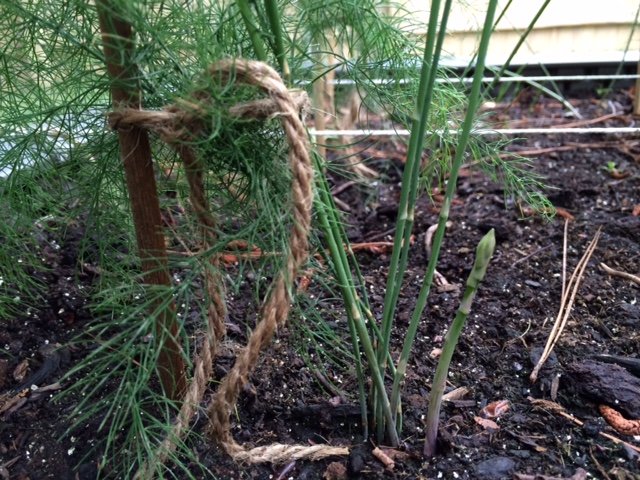 The spaghetti squash have reached the top of the 8' bamboo supports and are making good use of the top bar to spread out.
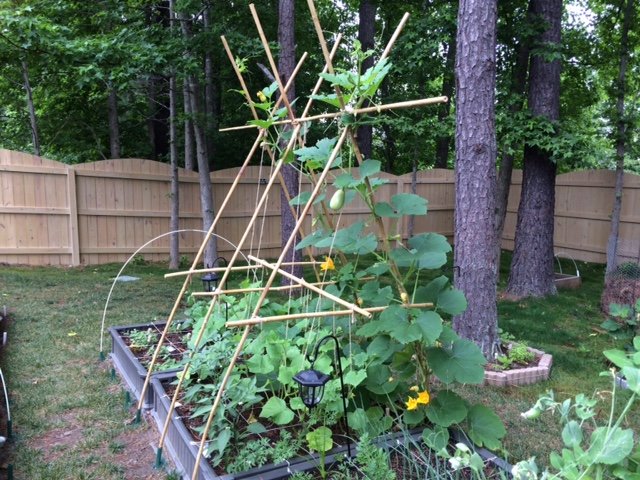 Not pictured:The blackberries are hard, green nubs right now. The pepper plants are flowering as are the zucchini, cucumbers and tomatoes. The chard is getting large and I hope to try stuffed chard leaves soon. The acorn squash is blooming but staying much closer to the ground than the climbing spaghetti.I love this time of year!
Good Companions, Bad Companions
"It is better to travel alone than with a bad companion"~ African ProverbGardening can be as simple or as complex as we chose to make it and the results will echo our intentions. An inclination to grow a few things will result in exactly that, a few things coming up. A desire to grow food will involve a bit more planning, time and effort to consider which items to grow and how best to grow them. A serious intention to grow as much food as possible within the space available on a continual basis will require careful planning, including crop rotations (which I discussed in a previous post), companion planting considerations (which I will discuss here) and strategic succession plantings to create a rolling harvest.Plants are a bit like dinner guests, there are some that seated side by side will find great pleasure in the symbiotic company and will make new friends while others that if placed in close proximity will antagonize each other. This is mostly related to nutrient and root/leaf space needs of different plant families but can also due to how some plants interact with their proximity (ex: alliums exude a chemical that inhibits the growth in legumes).You don't have to hit the botany books to steer clear of the antagonistic relationships or deduce which plants would make good companions - there are plenty of companion planting charts available online ranging from the very simple to the very complex. A little planning will increase your plants happiness and your harvest. Or you could just wing it ;)
Garden Toy - Hod
Zucchini and squash season is just around the corner and I had been looking for a replacement for my lovely, but somewhat lightweight flower basked that I use to gather what needs picking and what's for dinner (usually the same things) each day. After a few searches for garden baskets I ran across this shiny new toy, I mean garden hod. Pros:Food-grade vinyl-covered mesh means you can hose off produce right in the hod before bringing it inside16 quart capacity means plenty of space for an evening's bountyFlat bottom is perfect for when I want to use a small bowl to separate out small itemsSturdy construction...see belowCons:Sturdy construction - this hod is 3.5 lbs. when emptyPersonally, I am okay with the one con. I garden for a number of reasons and needing to exert a little physical energy to get my food is one of them.I give my new garden hod an A+
Night Garden
My back deck has a beautiful view of the garden and is one of my favorite places to be in the evenings. A few months ago I had the idea of adding some solar lanterns to the garden beds primarily as a safety precaution against guests tripping over raised-bed edges after dark but also to add a little visual interest to the garden during my evening reveries.Since then, the soft light of the lanterns kissing the plants good night has become one of my favorite ways to view the garden. My camera of choice (and necessity) is an iPhone 5s, so it is limited in its nighttime shooting capabilities even with the myriad of apps available so I shot this one just after dusk when the lights had begun their night watch but there was still enough light to not turn out a grainy image.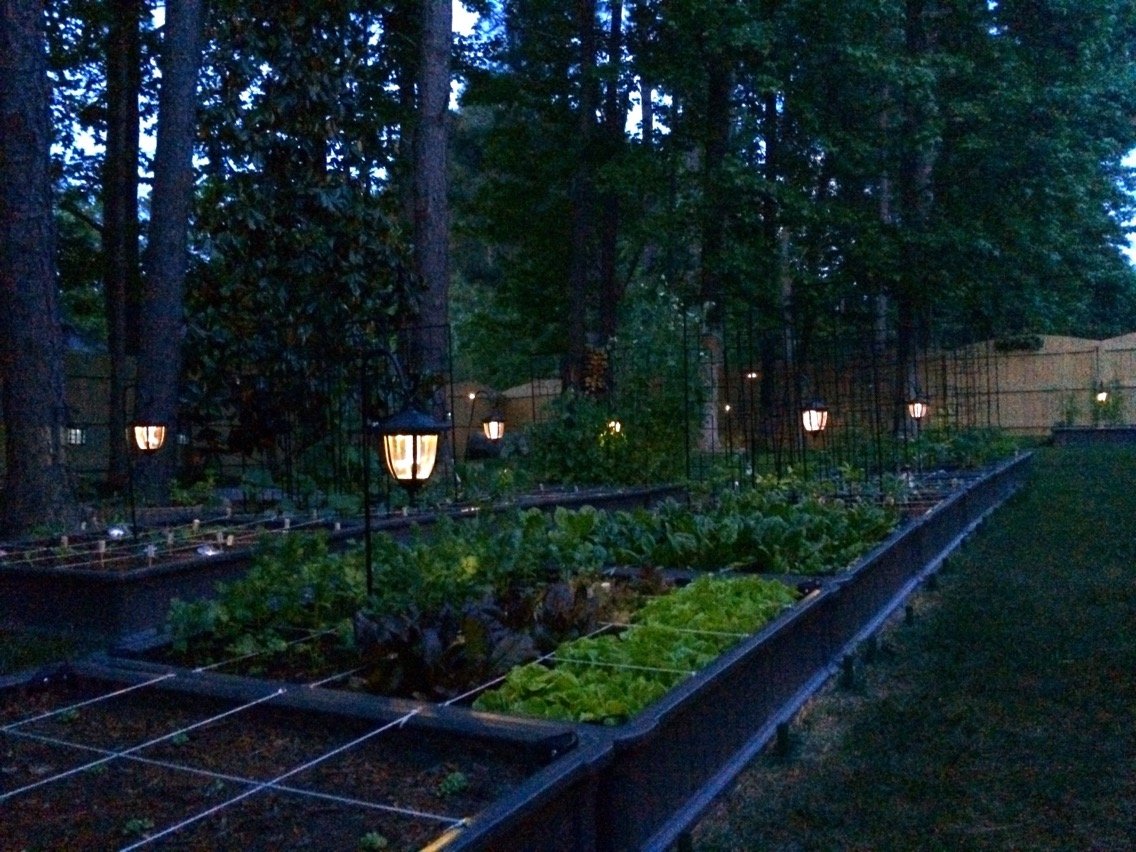
A Tisket, A Tasket
A tisket, a tasket, sandwich greens in my basket!Tonight's dinner shopping spree in the garden was for accouterments for egg salad sandwiches. Clockwise starting at the bottom is some spinach that is on the verge of bolting in this warm weather, some lola rosa lettuce, cilantro and those olive green sprigs at the 3 o'clock position are sweet pea shoots (trimmed from the growing tips of my producing plants) which add a light, sweet pea taste to any sandwich, salad or stir-fry. In the center are leek thinnings which I use like scallions and add a lightly onion taste to dishes.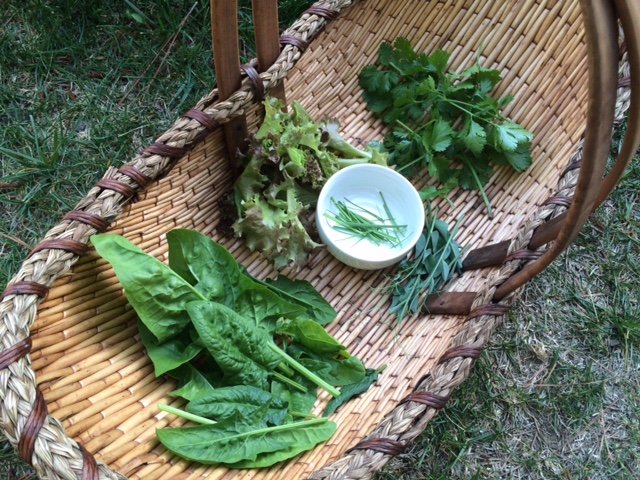 If you to garden but don't want to dine on salads nightly, I agree wholeheartedly and suggest we make a nice sandwich instead!
One Man's Trash is Another Man's Haute Cuisine
In the past couple of years microgreens have become a buzzword on restaurant menus and news articles talking about their nutritional content compared to the mature varieties of the same plant. Some early studies show that there may be reason to laud their nutritional content and chef's put them on their menus because they are delicious to the eye and the taste buds.I grow a number of indoor microgreens (basil, cilantro, mustard, arugula, beets) to add color, flavor and crunch to dishes but you don't have to set up a grow area to get some microgreens in your diet, you can just repurpose your plant thinnings.This year I overseeded my regular and dwarf varieties of pak choy and basil in my backyard garden because I was using 3 year old seeds and suspected that I would have low germination rates. Surprise, the seeds germinated at a remarkable rate and now I have a whole lot of extra seedlings that will have to be removed to make room for the vigorous individuals to grow to maturity. Rather than cut them and toss them in the compost, I let edible seedlings grow enough to be used as microgreens before snipping them down.Below you can see that I thinned one square of the dwarf pak choy that will be used as microgreens today and I will save thinning the square next to it until I can use them in a meal. Waste not, want not!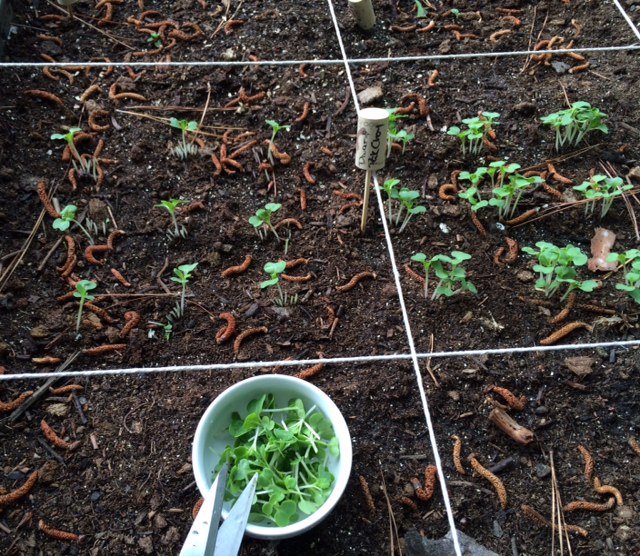 Whether you are just thinning seedlings or clipping microgreens to go into your next meal, be sure to use scissors or a similar sharp pruner to cut the plants at soil level. If you pull on your thinnings, you may damage the delicate roots of the one you have selected to grow to maturity.
Getting The Most From Your Harvest
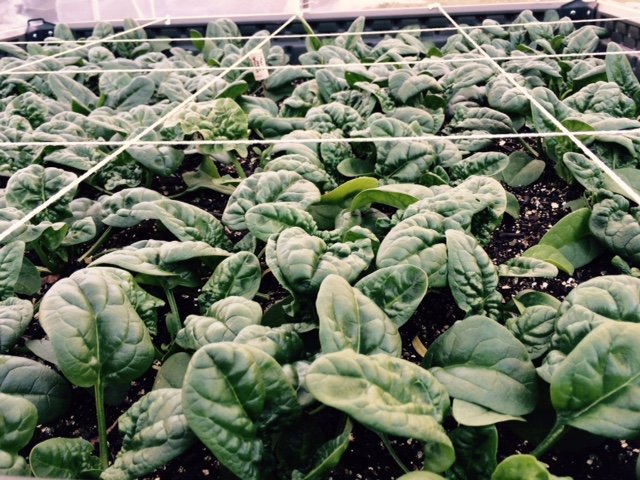
For urban growers, getting the most production out of the smallest space possible is an absolute priority! I can grow a lot in my 224 sq ft space, but there are ways of making what you grow give you even more.One of my favorite methods of getting more is to harvest leaves, but allow the plant to regenerate and keep growing more leaves. Not all garden plants are suitable to this, but if it is an herb or vegetable you grow for the leaves, chances are that you can.Some of my favorite plants to steal from are cilantro, chard, spinach, lettuce, basil, oregano, rosemary, sage, thyme and parsley and you can do this even when they are quite young. The trick is to only steal a little from each plant so the plant can recover and continue to grow.Below are my young cilantro plants. I choose the largest, oldest leaves from furthest down the plant stem to leave the fresh young growth undisturbed and pinch off one or two from each plant or as much as is needed for a meal.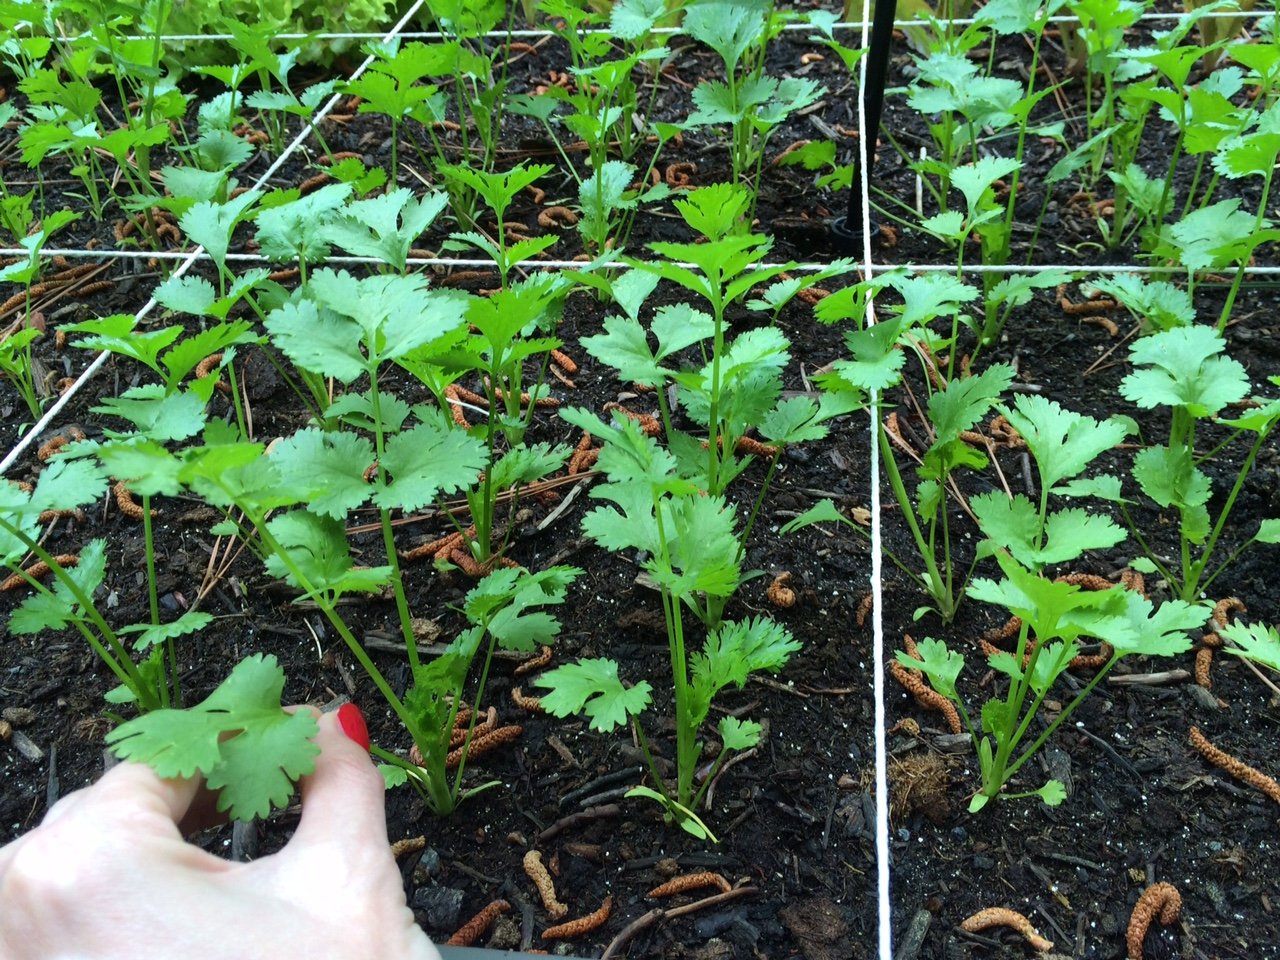 The spinach is more mature but I still want to keep the plants growing and only harvest what I need right before a meal.
 There is nothing fresher than still warm from the sun or wet from the rain.
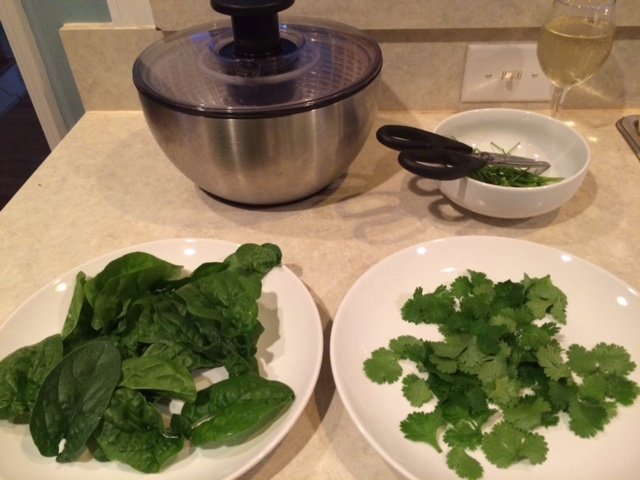 Who says you can't have your plants and eat them too :)*Note - even those little cilantro and spinach stems will be put to good use either as flavorings for stocks or to into the compost.
Full Spring Ahead
This morning the blueberry bushes were loaded with plumping berries,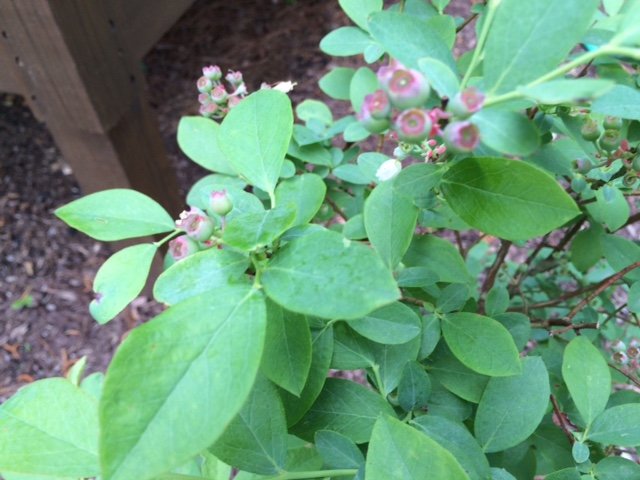 as well as a new crop of blooms.
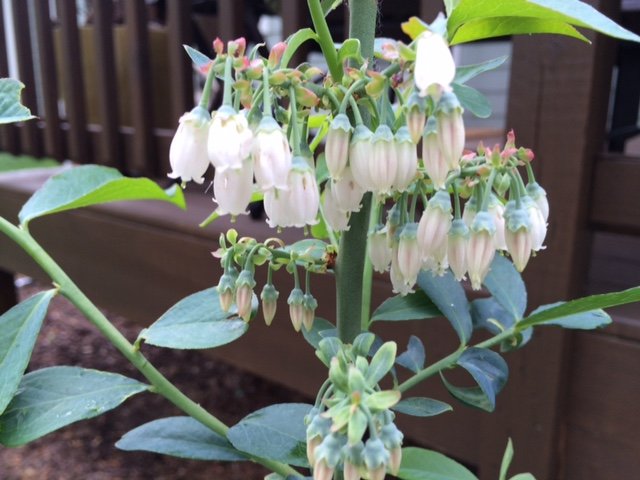 The beds are looking more green than brown with each passing day.
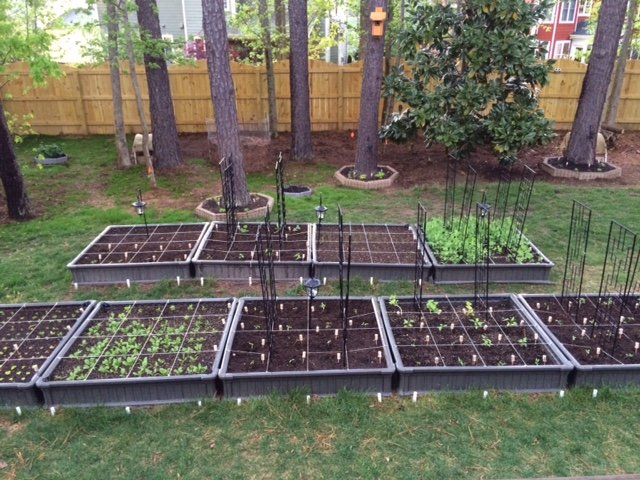 This afternoon the rain is the gardener so I am catching up on indoor projects. I started my first Elm Oyster Kit experimenting with a cloche instead of the humidity tent that comes with the kit. I really liked the Shiitake Blocks and plan to do them again soon but I wanted to learn more about the Elm Oysters because they are a forage mushroom in NC.
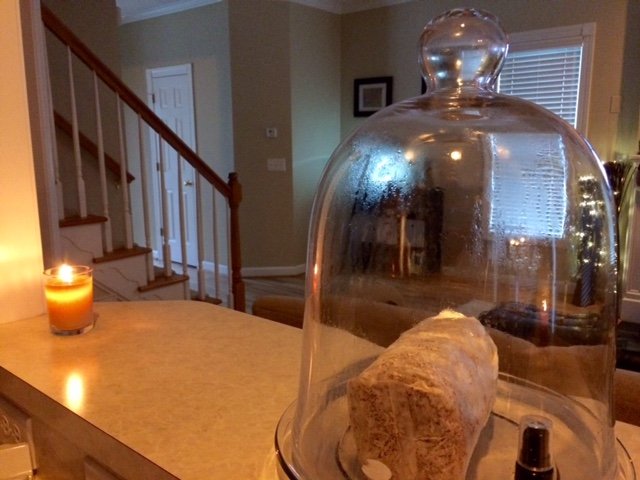
Growing My Garden
One month and seven days after the evil groundhog did his worst, the Raleigh area has had two days in a row that could reasonably be called spring-like. The latin edict of carpe diem sent me to my backyard today to set up my new garden beds in preparation for the spring planting and transplanting that will be upon me in a few short weeks.Back in 2011 when I was learning about square foot gardening, I did a lot of research on what to make my raised beds out of. I wanted to find something both durable but also easy to break down and transport since I knew I would only be in Kansas for a few years. I found the Lifetime Products 4 x 4 raised beds and have never looked back. They are easy to put together, rot resistant, BPA free, lightweight and transportable (10 of them traveled with me from Kansas after a year and a half in use) and are very nice to look at. I priced out the Lifetime beds compared to making wood ones and found the lifetime to be a better bargain for my needs.Today I wanted to show how easy they are to put together so here I am with my weed barrier in place and putting together one of my new beds in my On Screen Debut.Another benefit of the Lifetime beds is that they have little markers for the square footers among us. I use those guides to drop in small, galvanized screws and tie kitchen string between them to mark out my squares. It creates an attractive, floating (but still flexible) grid to plant within.I now have all of my beds set up and in place and just need to mix the soil for 4 of them. I have 8 that need to have their floating grids of kitchen string but should have my garden up and ready to go in the next two weeks, which is a good thing considering the size of my zucchini starts!
Rotation Reboot
Denial ain't just a river in Egypt - true in my Midwestern youth and true today.Last week I accidentally* ordered 4 additional garden beds instead of the 2 strictly required for my 2015 garden plan. Today, with extra garden beds waiting in the garage and a snow day in the Triangle at hand, I sat down to consider what to do about the 32 square feet of extra planting space I accidentally* acquired. As I considered whether to add new plants, expand the number of my current varieties or a combination of both, I kept thinking of this article I had run across a couple of weeks ago about crop rotation.Until now, I have done a pretty good job of refuting the quiet voice in the back of my mind talking about crop rotation with arguments like "I add compost regularly to my raised beds, so I am replacing the lost nutrients" and "my scale is to small to worry about crop rotation, and that is for monocultures anyway", but as I sat here today looking at what I had already planned and what I was planning to expand, it became harder and harder to not be a responsible steward of the soil I have made and hope to nourish my family with.At the same time I am garden planning, I am enjoying the Edible Education classes on youtube about the future of agriculture, arable land and food in America and the world.So back to the article for tips on rotations and my garden plan I went. My garden was not entirely hodgepodge, there was some method to my madness! I have a north facing backyard despite my strong preferences and best efforts when house hunting last summer, but if you can't be with the one you love, love the one you're with! So all the tall plants were planned for the back of the garden so they weren't casting shade on anyone behind them and the ones that need more sunlight hours were placed to the right of the garden which has more daylight hours before being shaded by my south facing house. Beyond those two considerations though, it probably was a bit of a hodgepodge.I started with color coding my planned plants according to the 4 main categories (leaves, fruits, roots and legumes) to see where I was - which was all over the place, then reorganized their placement into a more cohesive plan. I started at the left with the leaves and worked my way right to legumes with the idea that everything will shift to the right for 2016 and so on. I don't currently have an equal number of boxes devoted to the roots and legumes as I do for the leaves and fruits to make this work perfectly, but I am hoping that ending my denial and admitting I have a rotation problem is the first step in solving it.And since I was at it with color coding plant "types" on my Excel spreadsheet, I thought I might as well include the container plantings I had planned, the non-rotational plants (asparagus, some herbs and strawberries) I will have off-set from the Garden Proper and the Morel boxes I have in the tree line at the back of my property. And since I was going to include those, I may as well include a code for my preferred preservation techniques for each type... The red arrows are where trellis supports will be, and the 3 beds in blue will be off to the side and will not rotate from year to year. I think it is entirely likely that more beds will be added for 2016 and an effort will be made to utilize them for roots and legumes so I end up with a roughly even number for each overall type so the rotations work more uniformly.I plan to grow a handful of flower varieties with as many natives as possible to serve the local pollinators, but since I will not be eating them, I am comfortable putting them directly in the yard and not taking up precious garden space with them. Additionally I have my 5 blueberry plants, 4 fig trees (2 in the ground and 2 in containers), my Meyer Lemon and an indoor Bay Laurel.All in all, 2015 is shaping up to be a great year to grow and I am considering alternate irrigation sources now that I have cut Denial out of my garden plan.*tell me your definition of accident and I will tell you mine
New Beginnings
The groundhog has come out of his hole to do his evil once again this year and after few minutes spent researching his predictions (hint - he pretty much always sees his shadow and his accuracy is debatable) I got down to the real business of early February - seeds!My 2015 garden as it exists on paper and in seed packets, has already expanded over previous years' in terms of both square footage and vegetables to be grown. It may expand a bit more before the daffodils raise their heads and announce the official start of Gardener's Spring.I have been busily recycling the newspapers left in my driveway and on the office breakroom table for months into folded newspaper seed pots in preparation for this first full week of February.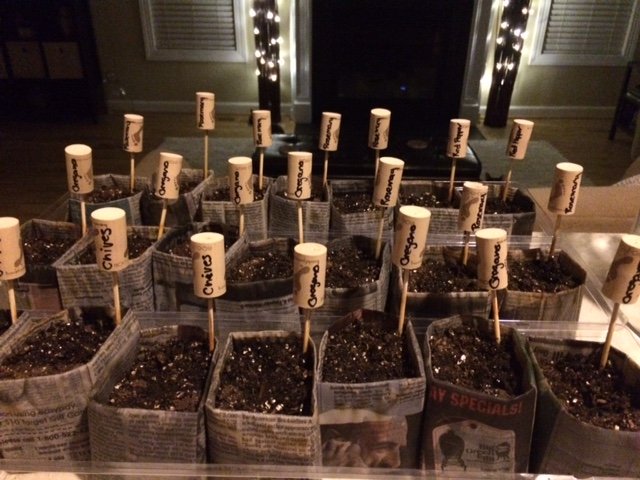
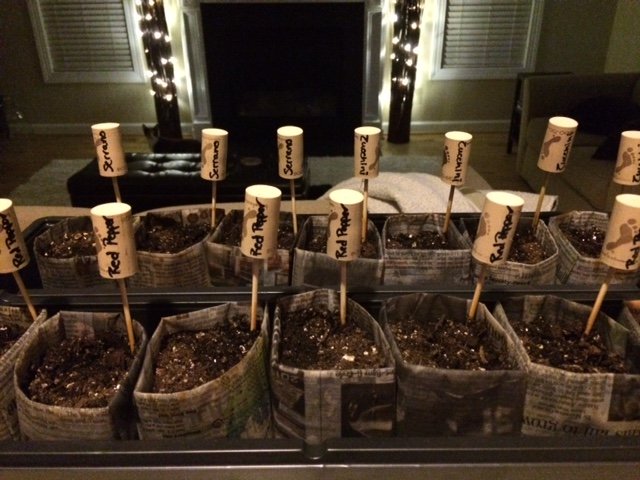 I would also like to that all those generous people that donated used wine corks for my plant markers ;)
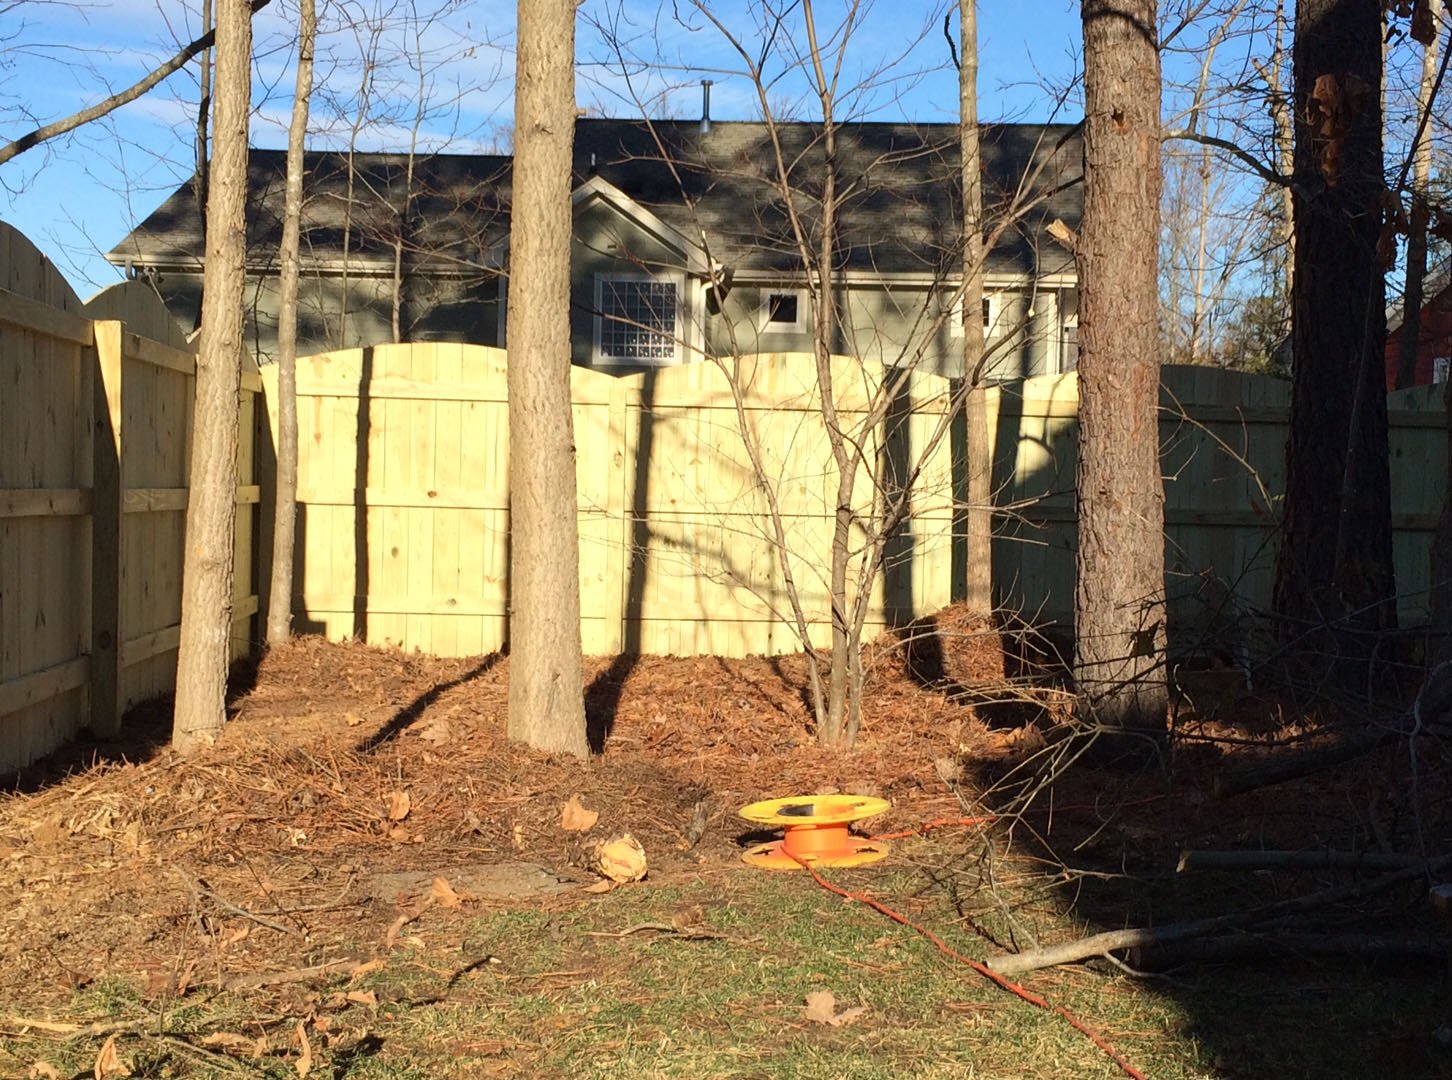
Mending Wall
The Mending Wall by Robert Frost is one of my favorite poems and I have found myself thinking of it often this past week as the contractors first set posts in concrete and then built the 6' privacy fence around my back yard. This poem which has spoken to me since my first reading of it is about of the mischievous spirit of the narrator that wants to tear down the proforma barriers between neighbors, in sharp contrast to my recent deliberations on the height and linear dimensions of the one I wished to erect.In the poem, the narrator has an apple orchard while his neighbor has pine trees, making a fence between them truly more a matter of principle than necessity. My little back yard garden on the other hand, is frequented by uninvited neighborhood deer, dogs, kids and rabbits. I erected my fence to not on the counterpoint of the poem's principle of "Good fences make good neighbors", but to avoid broken stems on spring transplants and trampled fall vegetables a week before their maturity date.Before the fence, my back yard would have been most easily divided visually and structurally into two nearly equal sections. The section closest to the house consisting of what most of us would call "yard", meaning an open, grassy space. The back half is sometimes jokingly and grandiosely referred to as "the woods", but would more accurately be described as a line of trees and scrub brush taking up the rear 1/2 of the yard. With the coming of the fence came the reclaiming of the portions that had been scrub and giving the majestic 3 story pines (some sweet gumball trees which I have an uneasy truce with) and the one magnolia a bit of elbow room to enjoy their life as backdrops to my urban garden.The clearing began today with the smallest of the sweet gumball trees and scrub being removed, pruning of suckers and small branches below 6' on the remaining gumballs and pines that will remain and the raking and removal of some of the ankle deep pine straw mulch covering the area to create clearings where herbs and pollinator friendly flowers will be planted in spring to compliment and benefit the vegetable garden.
Before
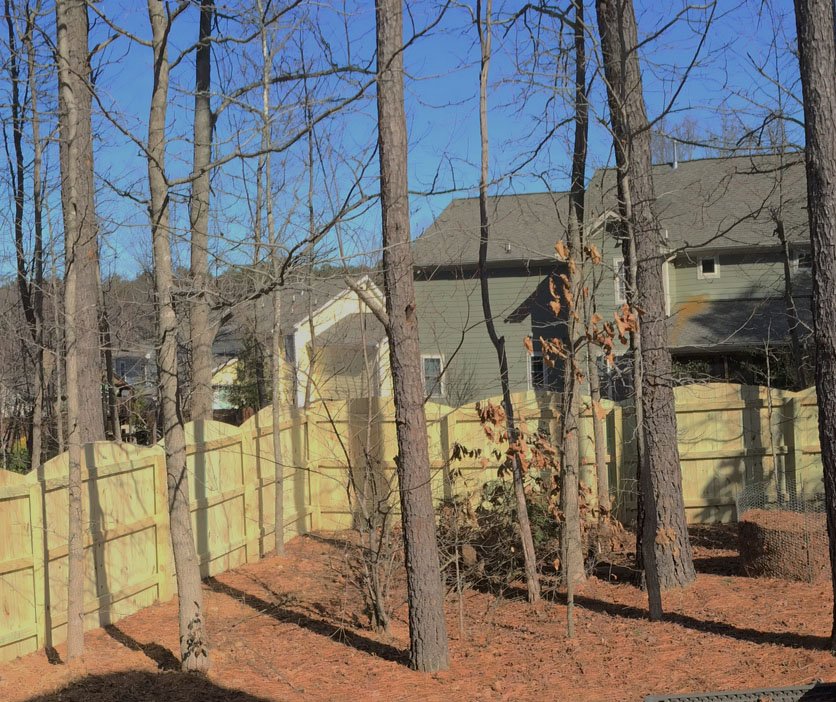 After
After
 There is much left to do and I will truly enjoy every minute of putting my little slice of land to its highest and best use to provide nourishment for the mind, body and soul.
December Greens
Collards and spinach may not qualify as Christmas Miracles in most circles, but having fresh, green produce right outside of your back door that is pest-free due to the season is not entirely unlike a miracle in winter.
 Merry, Merry!
Garden Craft
I ran across this wooden paper pot maker online and wanted to try it. I made a couple of so-so pots with it this morning then searched for a video tutorial to see if there were any tricks to doing it. During my search I ran across this origami paper pot video so I had to try that too.I think I prefer the origami version for strength of construction, aesthetics and depending on the seedling being started, size, but both fun ideas for biodegradable seedling pots that recycle newspaper.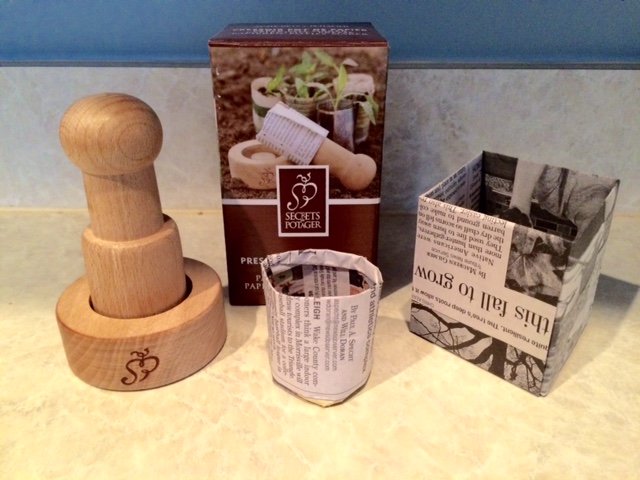
Mind the Gap
I finally completed my Planting Guide for the 2015 garden. I wanted a concise, visual reference for what I need to do throughout the year and to see if I could find any gaps between early and late cold weather crops for some summer succession plantings. I accomplished the first but failed in the later.Since I will not be able to grow red peppers between planting of my cold weather crops I will either have to cut back on quantities of something else or add another raised bed to grow everything I want in 2015.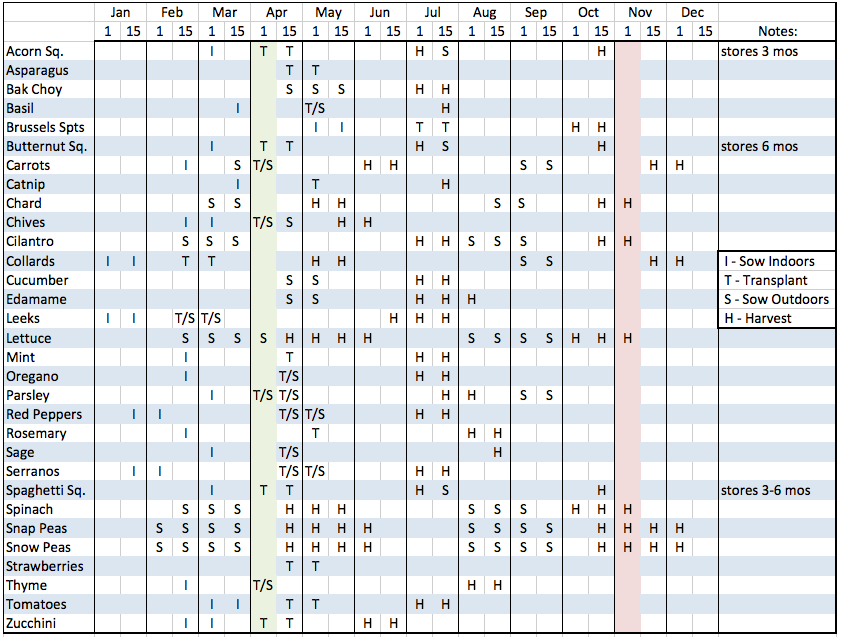
In and Out
I needed to travel to New Orleans last week on business and snapped a couple of pics of my indoor and outdoor gardens before I headed to the airport. I told myself that I took the pics in case I had time to update this blog while I traveled, but the truth is that I really enjoy seeing my little gardens every day whether I am home or not.Indoor garden
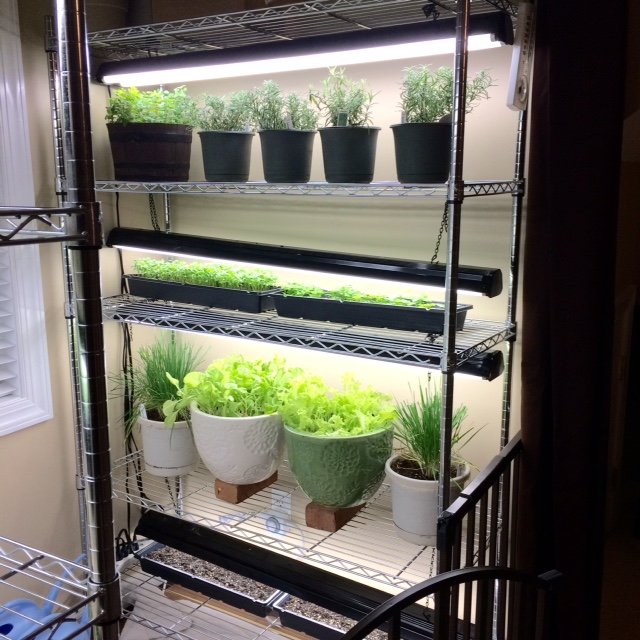
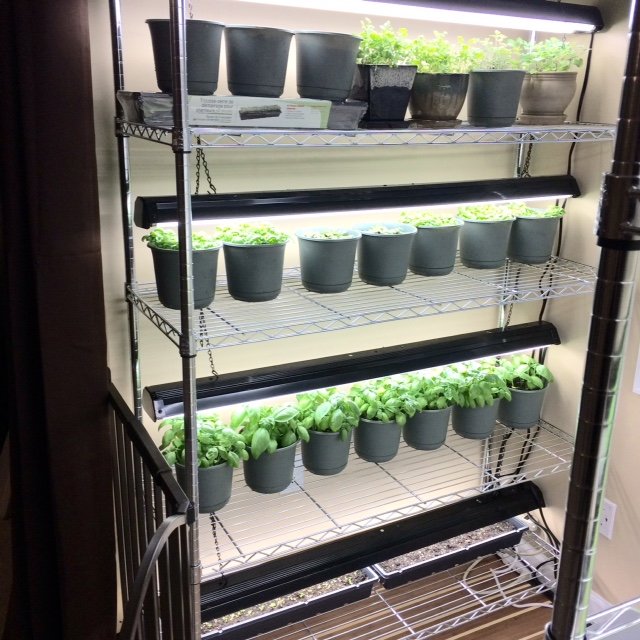 Outdoor garden
 And now that I am home and it is almost the weekend...expect an update!
Trouble With The Trees
My backyard garden is nestled between my backdoor and a 20 foot deep strip of pines and sweet gumball trees at the back of my property. There is a magnolia in there and a soft cedar that I have yet to identify, but overwhelmingly it is 2-3 story pines and sweet gumballs and they shed a LOT this time of year. Leaves, pine needles and eventually pine cones.I have spent enough time picking leaves and pine needles out of my garden beds to consider what a pine cone falling 3 stories onto a spinach plant might do to the plant and have taken evasive action.I had installed hoop covers a couple of weeks ago and tried bird netting to start with. Pine needles seem to have an uncanny way of falling straight down and bypassing the netting, but it was doing pretty well with the gumball leaves. Stepping up my game I am now trying garden mosquito netting that is water and light permeable. I had considered plastic sheeting which would serve the dual purpose of keeping out the trees' castoffs and turning my hoops into a low tunnel greenhouse, but it would also keep out rain and thereby increase watering requirements, so I settled on the mosquito netting and letting the plants tough out the coming cold temps.This morning brought a steady rain of both precipitation and tree bits and I am happy to say that the water got in and the tree bits stayed out!
Fall Garden Update
Despite my best efforts I ended up with a north facing back yard. I laid out my garden beds shortly after moving in and for weeks watched as the sun rose and set lower and lower into the southern sky each day and finally decided "what the heck". I planted my collards and spinach in the end most boxes which seemed to be getting the most sun hours each day. hoping they would do well but not really expecting them to. They have impressed me with their germination rate and growth.The first possible light freeze for this area is forecast for this week and I hope they have established themselves enough to withstand the cold. I am expanding my indoor garden this weekend either way!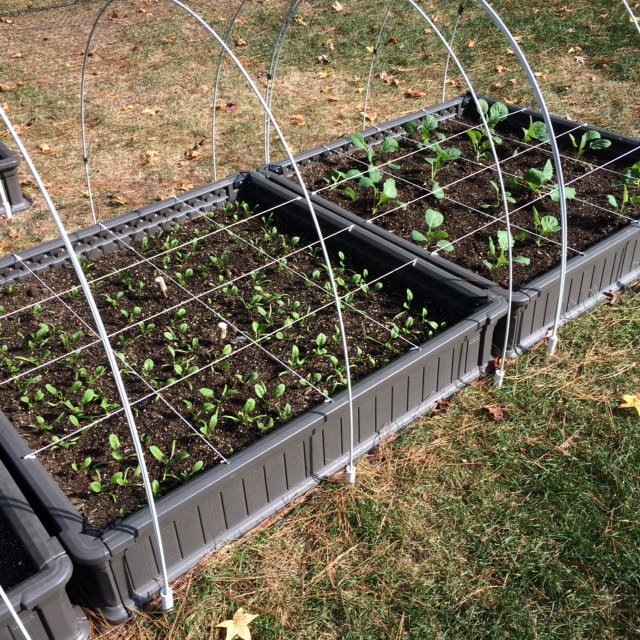
Square Foot Gardening Explained
I grew up with traditional gardening and farming so I am never surprised when people ask about weeding or tilling, neither of which I do. This video by Grow Veg does a great job of explaining the history and benefits of square foot gardening in only 6 minutes.