Last fall when I decided that edamame would be a fun and delicious addition to the garden, the only seed variety available through Baker Creek Heirloom Seeds was a variety called Envy.The spring crop consisted of roughly 130 plants in a 4'x4' bed. When the spinach and lettuce bolted in mid-May, I used some of the left over seeds to cover crop those areas until fall when I can replant leafy greens and start my fall planting of the soybeans.Earlier this month I harvested the official crop with a weigh in of 1lb, 6oz of pods. The cover crop plants are producing just as vigorously as the spring crop so it looks like I will have a bonus mid-summer harvest of Envy.Envy soybeans which average 2 beans per pod are on the smallish side for those of us used to restaurant edamame with its typical 3 and 4 beans. I did not use soil inoculants and relied on the native bacteria population in my soil to create a symbiotic relationship with the plants and form the nodules that help fix nitrogen. The nodules were stripped from the roots and worked back into the soil as I harvested the plants.
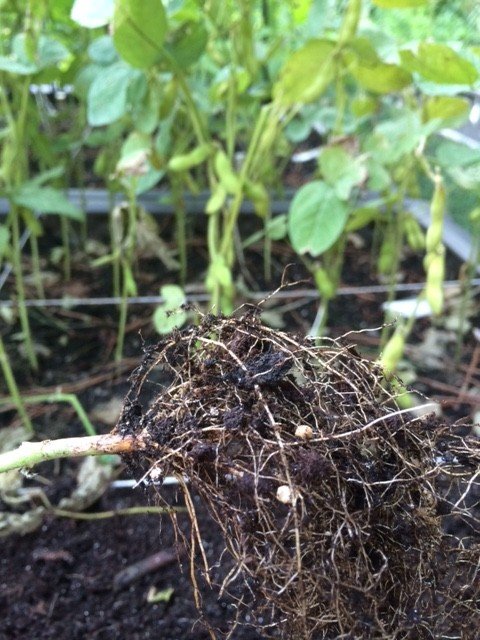 The pods were washed and blanched for 3 minutes, then plunged into ice water to stop the cooking process inside. They were dried by being spread on a towel then blotted with a second towel before being divvied into 3 freezer bags of about 7.3oz each.
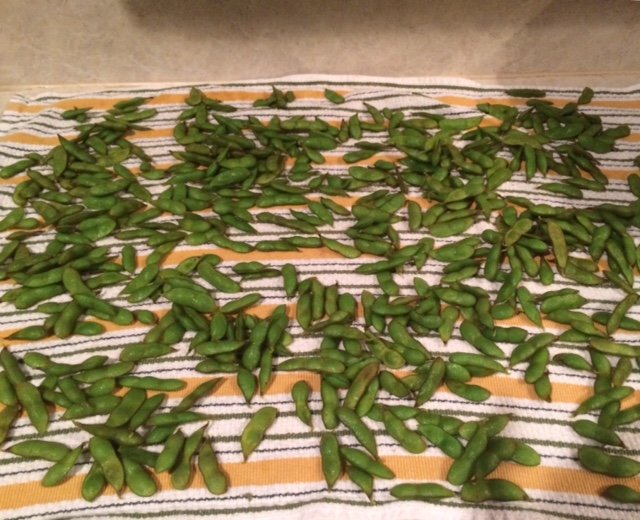 I waited about 2 weeks before preparing one of the packages to assess the entire enterprise.
 Lessons learned:1. Baker Creek has since added two other soybean varieties one of which averages 3 beans and I want to try it for my fall planting and compare the total pods/weight produced. The Envy were delicious and I am looking forward to preparing my cover crop harvest in a few weeks.2. Of the entire harvest, only a handful of beans had the fibrous taste and texture of being on the plant a little too long. I count this as a success since it was my first year growing and the harvest instructions say things like "harvest before the pods have a hint of yellow color". This is the sort of advice that only works AFTER they have a hint of yellow.3. The 7+oz servings were a little large, so next time I will prepare in 5oz packages.4. Edamame will now be a permanent fixture in my garden.
Canning - Green Beans
 I received a wonderful offer today from a dear friend and colleague. A hands-on canning lesson with fresh Blue Lake bush beans from her husband's garden. The photo below captures about half of his very productive garden. He is growing okra, summer squash, beans, broccoli, tomatoes, eggplant, basil and I am sure I am missing at least a few more.
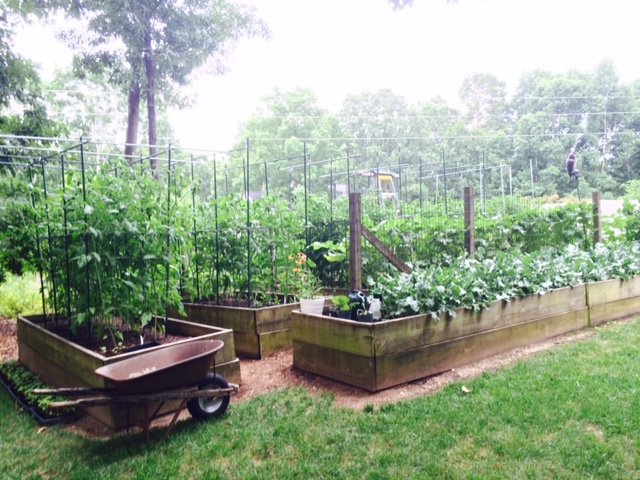 The Ball canning recipe book was open on the island and 6 quarts of beans were cleaned and snapped in a large bowl. We used a colander to submerge a portion of the beans into boiling water for 5 minutes.
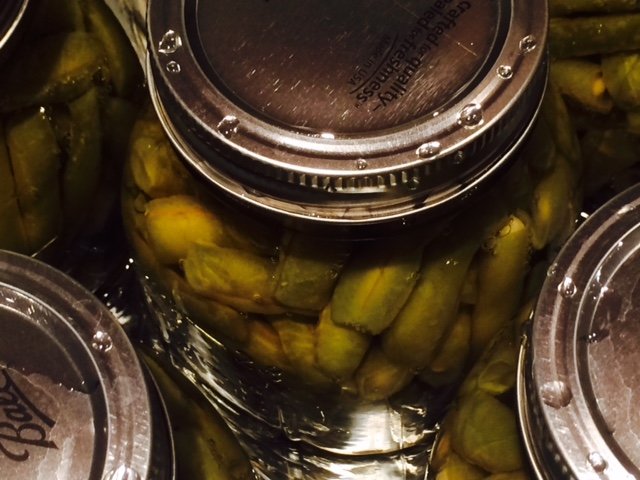
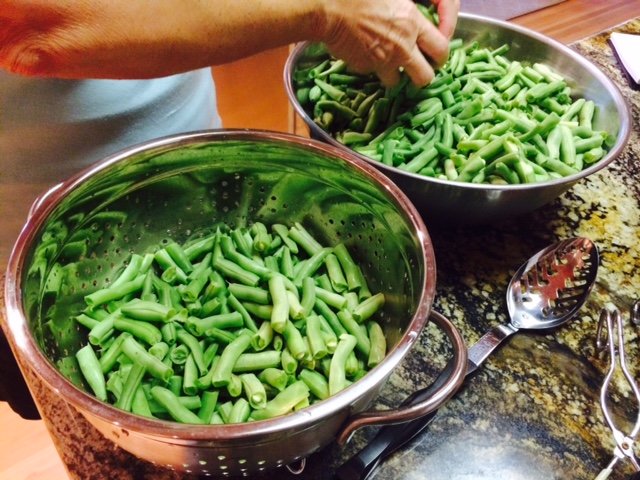 The 1 quart canning jars fresh out of a 180 degree hot water bath are started with 1 tsp. salt before being packed with freshly cooked beans to 1" from the top of the jar. The cooking liquid is then ladled in to the same 1" from the top. Long sticks are used to remove air bubbles by compressing the cooked beans inward from the jar and working all the way around it a couple of times.
 The liquid is topped off to 1" again and the neck of the jar cleaned to prepare it for being sealed.
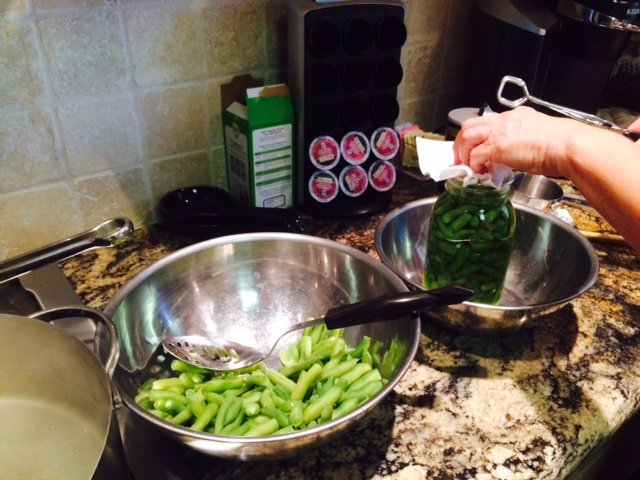 The hot lid is added fresh from the hot water bath (180 degrees) with tongs.
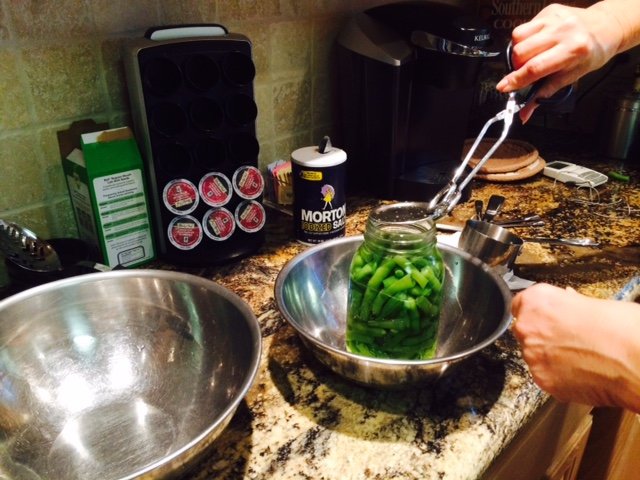 The lids are screwed on hand-tight and jars are packed into the pressure cooker.
 The recipe instructions for the pressure cooker are very specific. Eventually the pressure reaches 10 lbs and the beans are cooked another 25 minutes.
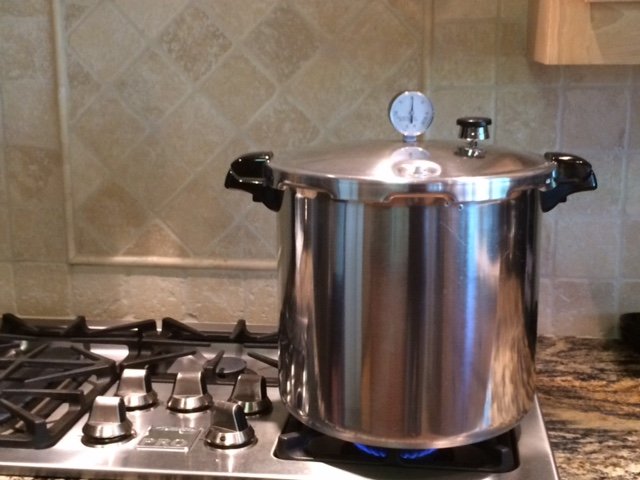 At the end of a couple of hours of wonderful company and conversation and a bit of vino, she had canned green beans and I had more experience and comfort with canning.
 On top of the lesson, she generously shared 2 quarts of the newly canned beans as well as some of their fresh garden bounty. I thanked her by graciously inviting myself to an upcoming tomato canning :)
Early July Update
This morning I started 22 strawberry runners and found another 8 that were already well established in the existing strawberry bed. I began this year with 32 plants and I think I will start 2016 with double the number.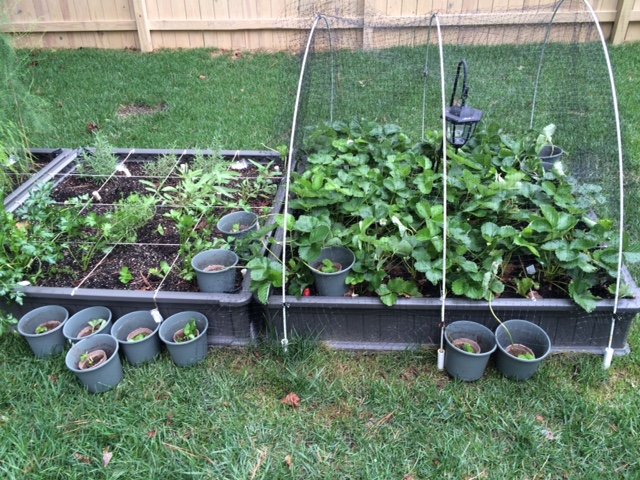 The serrano peppers are being harvested green but I am letting a few go to red also. They are hotter than jalapenos but I think they have a better flavor also.
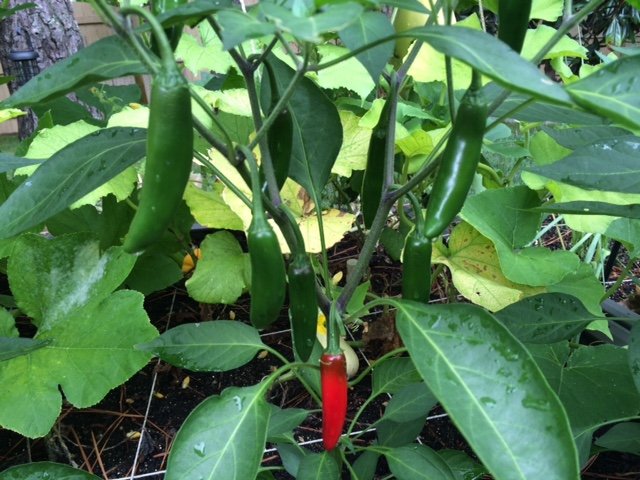 The Blue Beauty heirloom tomatoes are so pretty as their color develops. The bird netting has so far kept all of the slicing and roma tomatoes safe from birds and squirrels. My fingers are crossed that this holds true when they ripen too.
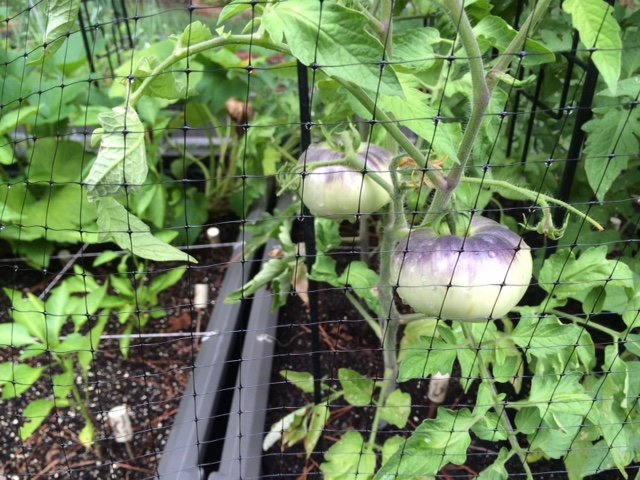 The first year blackberry has sent up one good cane so far which is secured to the trellis and is topped at 6.5' to encourage lateral shoots.
 The edamame is very close to harvest. I will freeze them in serving size vacuum sealed packages and hope to have enough to enjoy them throughout the year until the next harvest.
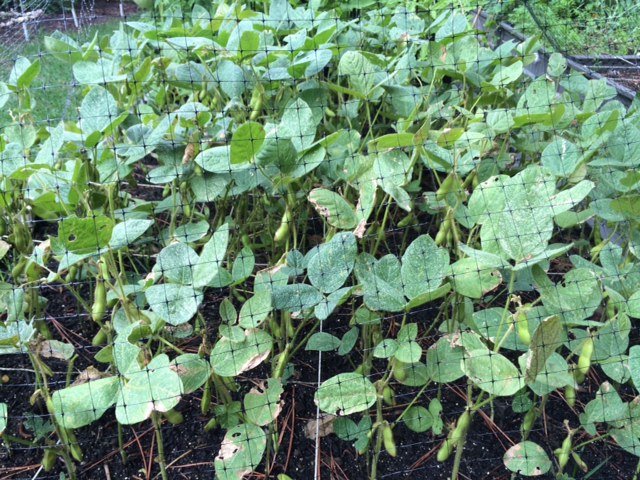 That's the garden update for this overcast and occasionally rainy July 3rd.
Two New Acquaintances
I made two new acquaintances in the garden this week. The first was the American Goldfinch of which the National Audubon Society book says of their call "bright per-chick-o-ree, also rendered as potato-chips", my new favorite bird fact.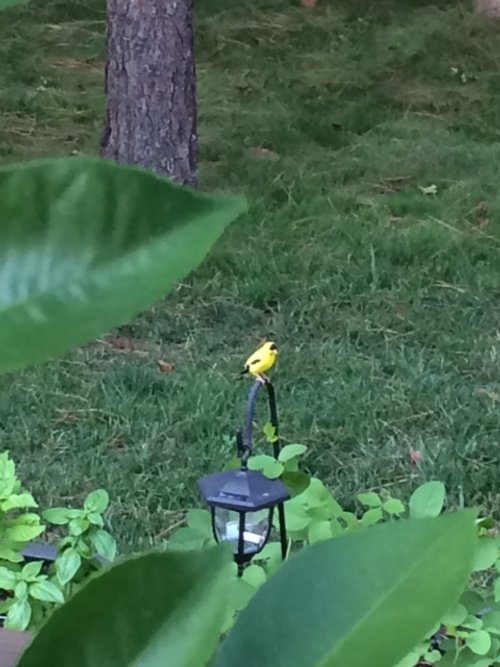 The other new acquaintance this week was not as charismatic as the goldfinch...
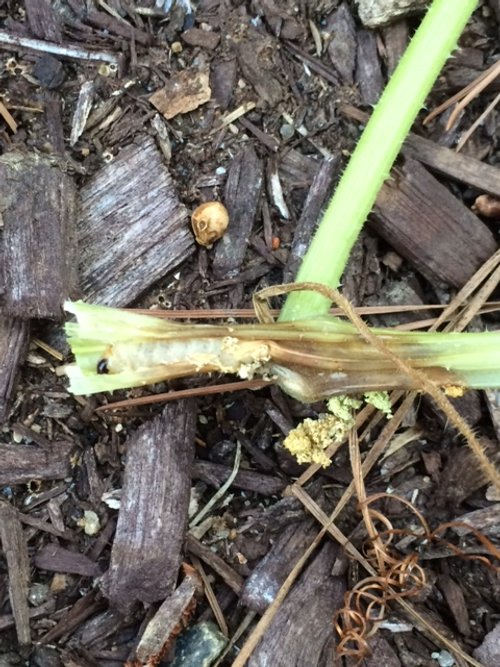 The Squash Vine Borer is the squash killing larvae of the Melitta Curcurbitae moth. As its name indicates, it bores into the hollow stems of squash plants and begins eating the plant from the inside out. Because the pest is hidden with the plant, organic treatments are pretty hands on. The best options are either to perform plant surgery and open up a little of the stem following the bore hole to find and dig out the worm and kill it or, and this will be my preferred method, running a toothpick through the plant stem, skewering and killing the larvae but leaving the plant less damaged than opening a larger hole.Fingers crossed my spaghetti squash makes it though the aggressive acupuncture treatment!
Temperate Permaculture
Every revisit to the documentary The Fruit Hunters sends me researching what fruit and nut trees are adapted to my hardiness zone to plan my future orchard. This exercise always begins with a self-reminder that the majority of exotic fruit grows in tropical climates but contains the hope that this time I will discover some forgotten native treasures or cultivars that are not commercially viable for my temperate climate.This time, rather than searching by hardiness zone which brings up a predictable list of cultivars on sale from nurseries, I searched for the climate zone and found an intriguing list that included kiwi, medlars, pawpaws, persimmons and quince at the Temperate Climate Permaculture blog.John Kitsteiner is the blogger and owner of the farm, Bauernhof Kitsteiner in Bull's Gap, TN, roughly 5 hours west of Raleigh. I started watching the videos in his vlog and was excited to see that the most recent video was from just two days ago. It will be cool to watch his farm evolve in real time.
A Collaborative Dance
I think of my garden as a collaborative dance with nature and I am always looking for ways to be a better dance partner.My garden is exactly one square foot smaller than the maximum allowed in the HOA rules so I was loathe to use valuable garden space for non-edible plants. Instead I decided to make flower beds around the pines and larger sweet gumballs that occupy the back 1/3 of my yard.When selecting what flowers to grow, I tried to stick with varieties that are native to this area to be low maintenance, have something blooming from spring through fall and hopefully be just like mom's cooking to the wild pollinators.Lucky for me this includes Lily of the Valley and Balsam (below, pink) with Canterbury Bells and Candytuft (below, purple) being naturalized.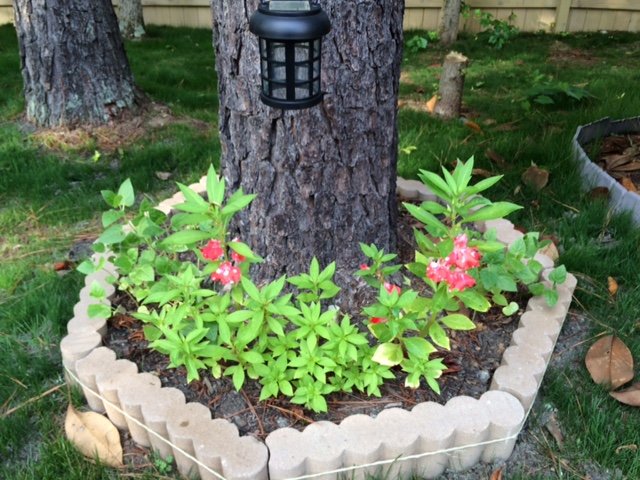
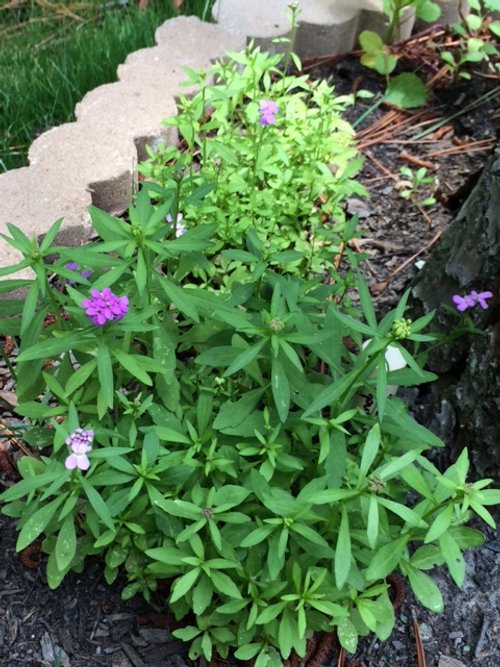 Despite not being native, I couldn't resist Mother of Pearl Poppys (below) and Four O' Clock Sweets.
 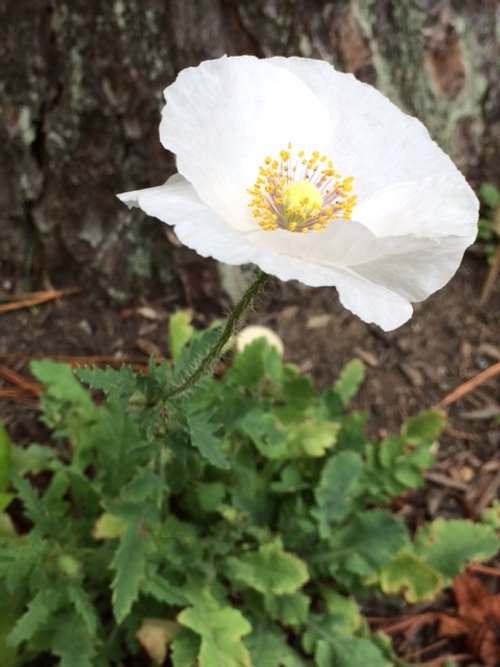 And in spring a colleague gifted me with some pink Calla Lily bulbs.
 I also have a Malope mix, 3 varieties of sunflowers, Blue Zebra Primrose and Zenias growing.I am trying to encourage nature by giving it what it needs, then mostly staying out of the way while it grows delicious food.
If I Were a Rich Man
I have the outlines of a dream homestead in mind and every time I think of it, the chorus from "If I Were a Rich Man" plays in my head. It sits on a small acreage, less than 15. It has a good sized, stocked lake, space for an expanded back yard garden, a greenhouse and a mixed fruit orchard. There is a place for a small apiary and for backyard chickens.Close on the heels of the song from Fiddler on the Roof is a tongue in cheek quote I first heard in a Michael Pollan book:As the farmer who won the lottery said when asked what he was going to do with his winnings, “Keep farming until it’s all gone.”While I enjoy the idea of my dream homestead, I am going to keep trying to make my .2 acres as productive as possible in the meantime!
Spring Garden to Summer Garden
It is June and the turning from the spring garden to the summer garden is well underway. I am quickly picking the last of my lettuce before it bolts meanwhile the edamame is flowering.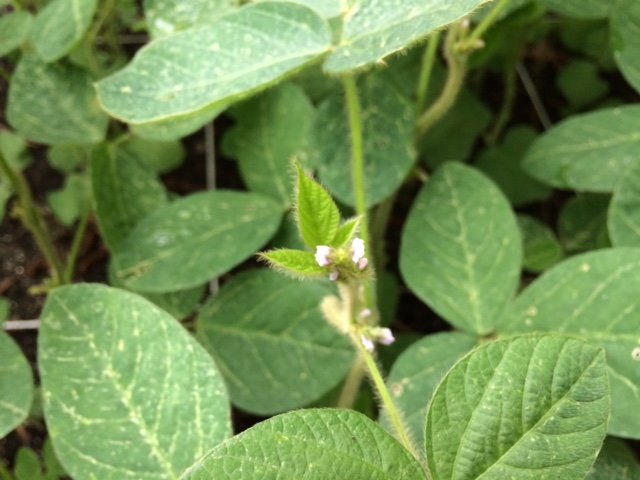 The sugar snap peas, snow peas and strawberries are in full swing while the blueberries are just beginning to take on a purple hue.
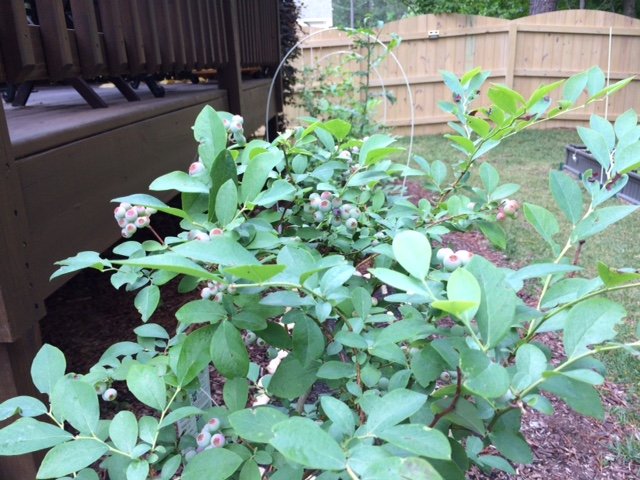 The serrano peppers are fruiting and flowering at the same time.
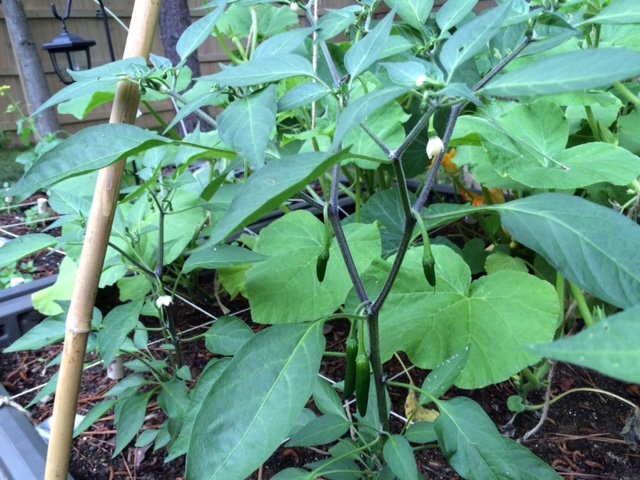 I am pleased with how many spears my first year asparagus crowns are throwing up. The shoots are tall and flopsy when they grow out so they are staked for support during this first unmolested this year. I hope to be able to sample a couple of spears next year and in 2017 they should be healthy, happy crowns I can harvest from.
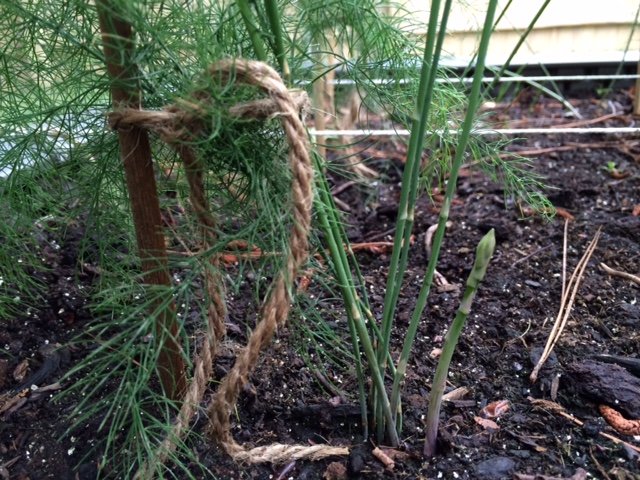 The spaghetti squash have reached the top of the 8' bamboo supports and are making good use of the top bar to spread out.
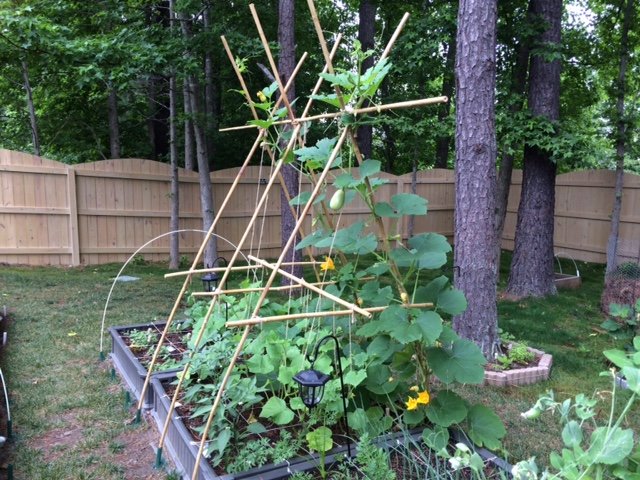 Not pictured:The blackberries are hard, green nubs right now. The pepper plants are flowering as are the zucchini, cucumbers and tomatoes. The chard is getting large and I hope to try stuffed chard leaves soon. The acorn squash is blooming but staying much closer to the ground than the climbing spaghetti.I love this time of year!
On Kaizen and Garden Logs
Kaizen is a word that has one meaning in the dictionary sense and a wholly different meaning in the popular mind. The dictionary definition is "change for the better", but over time, this word has morphed through its adaptation both as a business philosophy and a motivational concept into something more akin to "constant, incremental improvement" - that we should seek to do each and every thing we do, no matter how small or great, a little better than we did the day before. The philosophy that has grown up around kaizen doesn't contemplate ever actually reaching perfection, only continually striving to be closer to it. Jiro Dreams of Sushi is a fantastic documentary that displays the heart of kaizen.Gardens are a great place to embrace the practice of kaizen as they will enthusiastically share with us laundry lists of ways that we could plan, execute, research or just plain do better each day, week, month and year. And luckily we can keep garden logs (or journals) to make note of all of those over and under-estimates, the good ideas and the bad, the lucky guesses and unlucky ones, and of course, how much produce was grown in the garden during the year.Gardens and gardeners are both works in progress, but it is the gardener that must implement the incremental improvements. Noting in my log that my cilantro and spinach bolted this year during the week I was in DC this May, I can plan to harvest a couple of weeks earlier next year and keep more of my spring harvest. Garden logs are also helpful to review in fall/winter when planning the following year's garden. What varieties did well and which did not? Was one variety slower to bolt?Approaching our gardens with the philosophy of kaizen, not always getting it right but always improving and logging on a regular basis what we see happening in the garden is less discouraging when things don't work out as envisioned than "anything worth doing is worth doing right the first time" for new growers.Here's to always growing!
Good Companions, Bad Companions
"It is better to travel alone than with a bad companion"~ African ProverbGardening can be as simple or as complex as we chose to make it and the results will echo our intentions. An inclination to grow a few things will result in exactly that, a few things coming up. A desire to grow food will involve a bit more planning, time and effort to consider which items to grow and how best to grow them. A serious intention to grow as much food as possible within the space available on a continual basis will require careful planning, including crop rotations (which I discussed in a previous post), companion planting considerations (which I will discuss here) and strategic succession plantings to create a rolling harvest.Plants are a bit like dinner guests, there are some that seated side by side will find great pleasure in the symbiotic company and will make new friends while others that if placed in close proximity will antagonize each other. This is mostly related to nutrient and root/leaf space needs of different plant families but can also due to how some plants interact with their proximity (ex: alliums exude a chemical that inhibits the growth in legumes).You don't have to hit the botany books to steer clear of the antagonistic relationships or deduce which plants would make good companions - there are plenty of companion planting charts available online ranging from the very simple to the very complex. A little planning will increase your plants happiness and your harvest. Or you could just wing it ;)
A Tisket, A Tasket
A tisket, a tasket, sandwich greens in my basket!Tonight's dinner shopping spree in the garden was for accouterments for egg salad sandwiches. Clockwise starting at the bottom is some spinach that is on the verge of bolting in this warm weather, some lola rosa lettuce, cilantro and those olive green sprigs at the 3 o'clock position are sweet pea shoots (trimmed from the growing tips of my producing plants) which add a light, sweet pea taste to any sandwich, salad or stir-fry. In the center are leek thinnings which I use like scallions and add a lightly onion taste to dishes.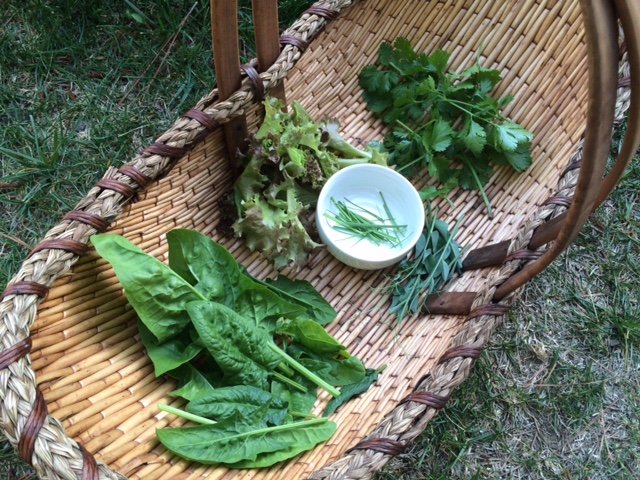 If you to garden but don't want to dine on salads nightly, I agree wholeheartedly and suggest we make a nice sandwich instead!
One Man's Trash is Another Man's Haute Cuisine
In the past couple of years microgreens have become a buzzword on restaurant menus and news articles talking about their nutritional content compared to the mature varieties of the same plant. Some early studies show that there may be reason to laud their nutritional content and chef's put them on their menus because they are delicious to the eye and the taste buds.I grow a number of indoor microgreens (basil, cilantro, mustard, arugula, beets) to add color, flavor and crunch to dishes but you don't have to set up a grow area to get some microgreens in your diet, you can just repurpose your plant thinnings.This year I overseeded my regular and dwarf varieties of pak choy and basil in my backyard garden because I was using 3 year old seeds and suspected that I would have low germination rates. Surprise, the seeds germinated at a remarkable rate and now I have a whole lot of extra seedlings that will have to be removed to make room for the vigorous individuals to grow to maturity. Rather than cut them and toss them in the compost, I let edible seedlings grow enough to be used as microgreens before snipping them down.Below you can see that I thinned one square of the dwarf pak choy that will be used as microgreens today and I will save thinning the square next to it until I can use them in a meal. Waste not, want not!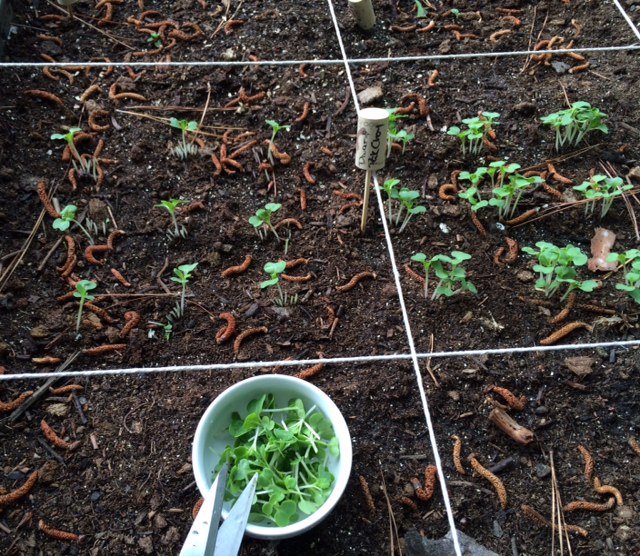 Whether you are just thinning seedlings or clipping microgreens to go into your next meal, be sure to use scissors or a similar sharp pruner to cut the plants at soil level. If you pull on your thinnings, you may damage the delicate roots of the one you have selected to grow to maturity.
Getting The Most From Your Harvest
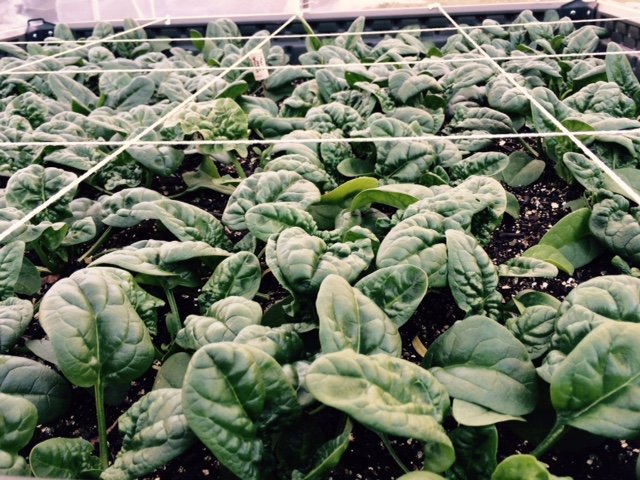
For urban growers, getting the most production out of the smallest space possible is an absolute priority! I can grow a lot in my 224 sq ft space, but there are ways of making what you grow give you even more.One of my favorite methods of getting more is to harvest leaves, but allow the plant to regenerate and keep growing more leaves. Not all garden plants are suitable to this, but if it is an herb or vegetable you grow for the leaves, chances are that you can.Some of my favorite plants to steal from are cilantro, chard, spinach, lettuce, basil, oregano, rosemary, sage, thyme and parsley and you can do this even when they are quite young. The trick is to only steal a little from each plant so the plant can recover and continue to grow.Below are my young cilantro plants. I choose the largest, oldest leaves from furthest down the plant stem to leave the fresh young growth undisturbed and pinch off one or two from each plant or as much as is needed for a meal.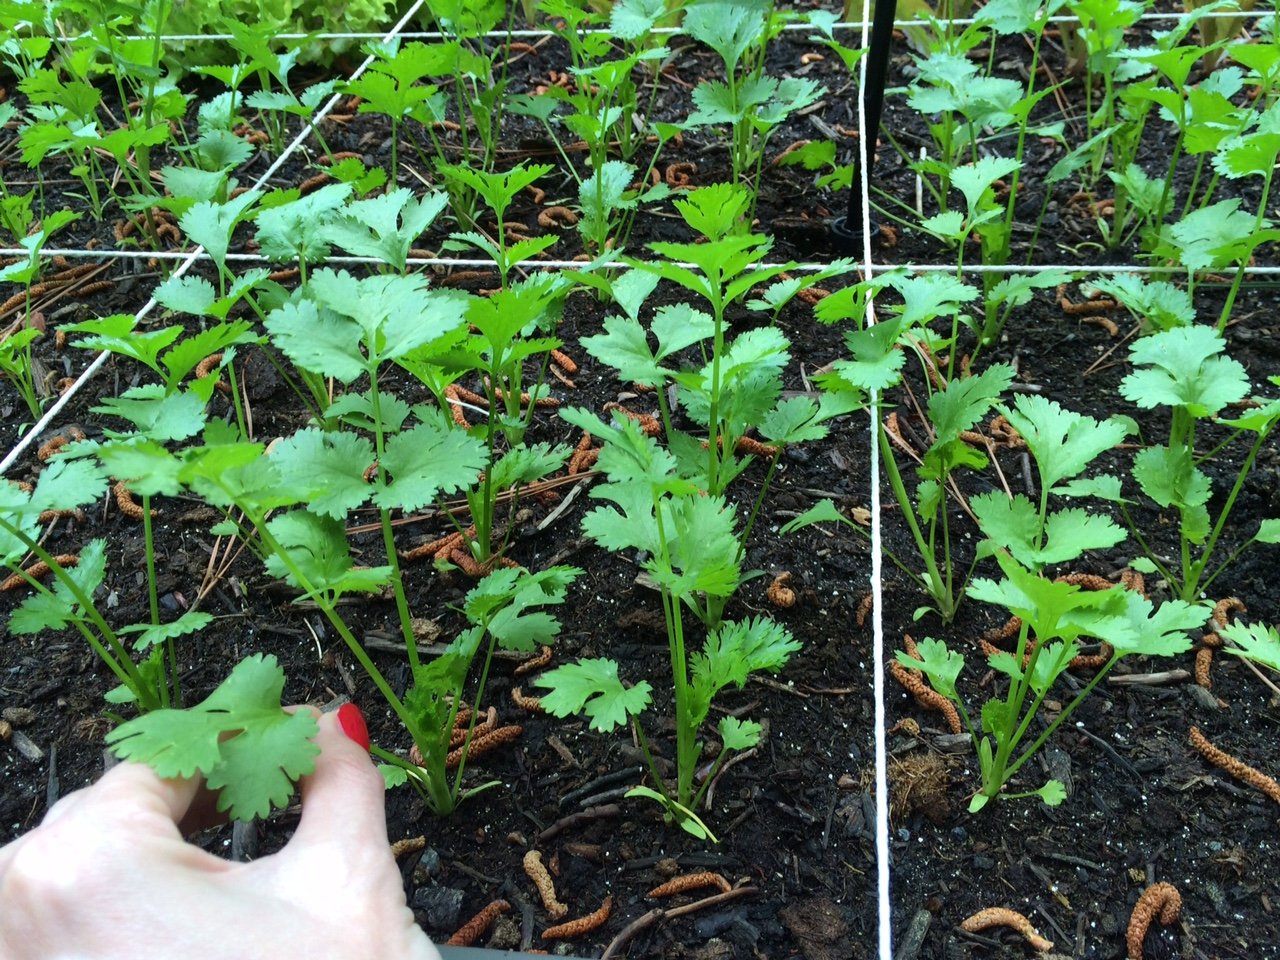 The spinach is more mature but I still want to keep the plants growing and only harvest what I need right before a meal.
 There is nothing fresher than still warm from the sun or wet from the rain.
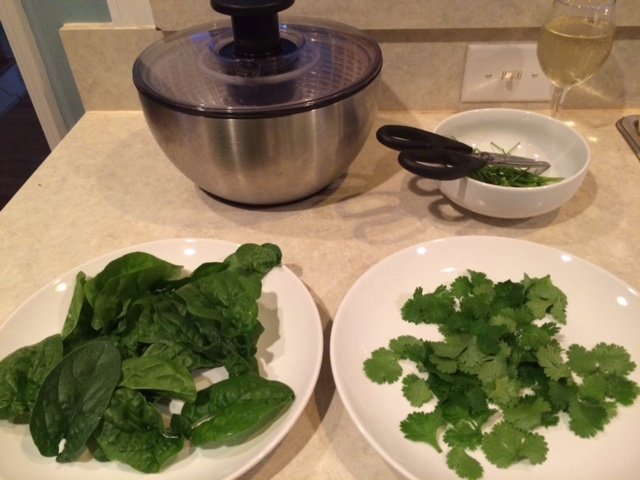 Who says you can't have your plants and eat them too :)*Note - even those little cilantro and spinach stems will be put to good use either as flavorings for stocks or to into the compost.
Extensive Gardening
If you are not familiar with the terms extensive and intensive, they can be a bit misleading. Extensive doesn't mean large, it means requiring little or no additional inputs (fertilizer, compost, labor, etc.) and intensive doesn't mean working hard, it means using a lot of those same inputs. A great primer on the differences can be found here.For my initial garden set up, it was intensive. I purchased the raised beds, the materials to make soil (compost, vermiculite and peat moss) and seeds. But once it is set up, I was able to become much more extensive. I save seeds, any part of the plants that do not end up on a dinner plate go into the compost to feed the next generation, seedlings that need to be thinned have those same two options - food or compost, or as my son says "the circle of life".I still have water as a major input when the skies aren't doing the watering for me and I still have to buy some seed, but otherwise it is a pretty closed cycle with most of what my garden needs coming from my garden and yard. I have looked into the rain barrel collection options but I am not convinced that water that has run off a petroleum based shingle roof is a good idea for growing my food.In the meantime, more and more people like me, who have a generational disconnect from the conventional farming ways of our grandparents and great-grandparents are taking up farming and urban farming. With this new generation of growers we are seeing an entirely new set of best practices and innovative ideas. Maybe someday soon I will be able to have a completely closed system.
Growing My Garden
One month and seven days after the evil groundhog did his worst, the Raleigh area has had two days in a row that could reasonably be called spring-like. The latin edict of carpe diem sent me to my backyard today to set up my new garden beds in preparation for the spring planting and transplanting that will be upon me in a few short weeks.Back in 2011 when I was learning about square foot gardening, I did a lot of research on what to make my raised beds out of. I wanted to find something both durable but also easy to break down and transport since I knew I would only be in Kansas for a few years. I found the Lifetime Products 4 x 4 raised beds and have never looked back. They are easy to put together, rot resistant, BPA free, lightweight and transportable (10 of them traveled with me from Kansas after a year and a half in use) and are very nice to look at. I priced out the Lifetime beds compared to making wood ones and found the lifetime to be a better bargain for my needs.Today I wanted to show how easy they are to put together so here I am with my weed barrier in place and putting together one of my new beds in my On Screen Debut.Another benefit of the Lifetime beds is that they have little markers for the square footers among us. I use those guides to drop in small, galvanized screws and tie kitchen string between them to mark out my squares. It creates an attractive, floating (but still flexible) grid to plant within.I now have all of my beds set up and in place and just need to mix the soil for 4 of them. I have 8 that need to have their floating grids of kitchen string but should have my garden up and ready to go in the next two weeks, which is a good thing considering the size of my zucchini starts!
Rotation Reboot
Denial ain't just a river in Egypt - true in my Midwestern youth and true today.Last week I accidentally* ordered 4 additional garden beds instead of the 2 strictly required for my 2015 garden plan. Today, with extra garden beds waiting in the garage and a snow day in the Triangle at hand, I sat down to consider what to do about the 32 square feet of extra planting space I accidentally* acquired. As I considered whether to add new plants, expand the number of my current varieties or a combination of both, I kept thinking of this article I had run across a couple of weeks ago about crop rotation.Until now, I have done a pretty good job of refuting the quiet voice in the back of my mind talking about crop rotation with arguments like "I add compost regularly to my raised beds, so I am replacing the lost nutrients" and "my scale is to small to worry about crop rotation, and that is for monocultures anyway", but as I sat here today looking at what I had already planned and what I was planning to expand, it became harder and harder to not be a responsible steward of the soil I have made and hope to nourish my family with.At the same time I am garden planning, I am enjoying the Edible Education classes on youtube about the future of agriculture, arable land and food in America and the world.So back to the article for tips on rotations and my garden plan I went. My garden was not entirely hodgepodge, there was some method to my madness! I have a north facing backyard despite my strong preferences and best efforts when house hunting last summer, but if you can't be with the one you love, love the one you're with! So all the tall plants were planned for the back of the garden so they weren't casting shade on anyone behind them and the ones that need more sunlight hours were placed to the right of the garden which has more daylight hours before being shaded by my south facing house. Beyond those two considerations though, it probably was a bit of a hodgepodge.I started with color coding my planned plants according to the 4 main categories (leaves, fruits, roots and legumes) to see where I was - which was all over the place, then reorganized their placement into a more cohesive plan. I started at the left with the leaves and worked my way right to legumes with the idea that everything will shift to the right for 2016 and so on. I don't currently have an equal number of boxes devoted to the roots and legumes as I do for the leaves and fruits to make this work perfectly, but I am hoping that ending my denial and admitting I have a rotation problem is the first step in solving it.And since I was at it with color coding plant "types" on my Excel spreadsheet, I thought I might as well include the container plantings I had planned, the non-rotational plants (asparagus, some herbs and strawberries) I will have off-set from the Garden Proper and the Morel boxes I have in the tree line at the back of my property. And since I was going to include those, I may as well include a code for my preferred preservation techniques for each type... The red arrows are where trellis supports will be, and the 3 beds in blue will be off to the side and will not rotate from year to year. I think it is entirely likely that more beds will be added for 2016 and an effort will be made to utilize them for roots and legumes so I end up with a roughly even number for each overall type so the rotations work more uniformly.I plan to grow a handful of flower varieties with as many natives as possible to serve the local pollinators, but since I will not be eating them, I am comfortable putting them directly in the yard and not taking up precious garden space with them. Additionally I have my 5 blueberry plants, 4 fig trees (2 in the ground and 2 in containers), my Meyer Lemon and an indoor Bay Laurel.All in all, 2015 is shaping up to be a great year to grow and I am considering alternate irrigation sources now that I have cut Denial out of my garden plan.*tell me your definition of accident and I will tell you mine
December Greens
Collards and spinach may not qualify as Christmas Miracles in most circles, but having fresh, green produce right outside of your back door that is pest-free due to the season is not entirely unlike a miracle in winter.
 Merry, Merry!
Garden Craft
I ran across this wooden paper pot maker online and wanted to try it. I made a couple of so-so pots with it this morning then searched for a video tutorial to see if there were any tricks to doing it. During my search I ran across this origami paper pot video so I had to try that too.I think I prefer the origami version for strength of construction, aesthetics and depending on the seedling being started, size, but both fun ideas for biodegradable seedling pots that recycle newspaper.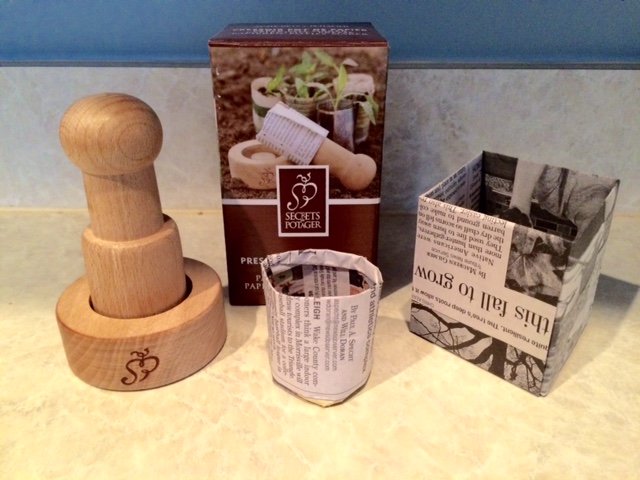
Spinning Gold
Fall fell on the Triangle region while I was in New Orleans and the pace of leaf drop from the trees in my back yard is picking up speed. The water and light permeable row covers I have over my collards and spinach is doing a great job of protecting the beds from litter. But what to do with all of those leaves? I have more leaves than I could possibly mix in my compost bins since I had a late start to my gardens this year and I just don't have the greens to off-set the carbon.A few years ago I had seen an episode of Ask This Old House with Roger Cook talking about making leaf bin out of fencing to let the leaves compost on their own into leaf mold. This seemed a better use of the nutrients falling on my garden than curbside pickup so a quick trip to Lowe's later, I set up my own leaf bin.
 It blends perfectly into the landscape and is currently holding .2 acres worth of leaves. Because I have a healthy amount of pine needles mixed in with the leaves, I took it one step further and used my weedwacker as as immersion blender to help get the process started by breaking down some of the leaves and needles as well as creating a little more room on top for round two which is sure to happen next weekend.I only purchased 4 rebars to do one bin but I have enough chicken wire left to do at least two more if I need to. All in all, a fun project with an attractive result that will give me gardening gold for my plants next year.
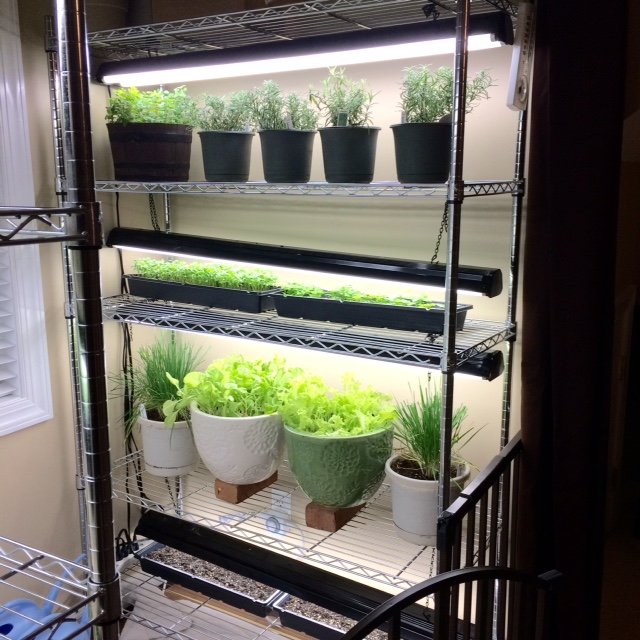
In and Out
I needed to travel to New Orleans last week on business and snapped a couple of pics of my indoor and outdoor gardens before I headed to the airport. I told myself that I took the pics in case I had time to update this blog while I traveled, but the truth is that I really enjoy seeing my little gardens every day whether I am home or not.Indoor garden
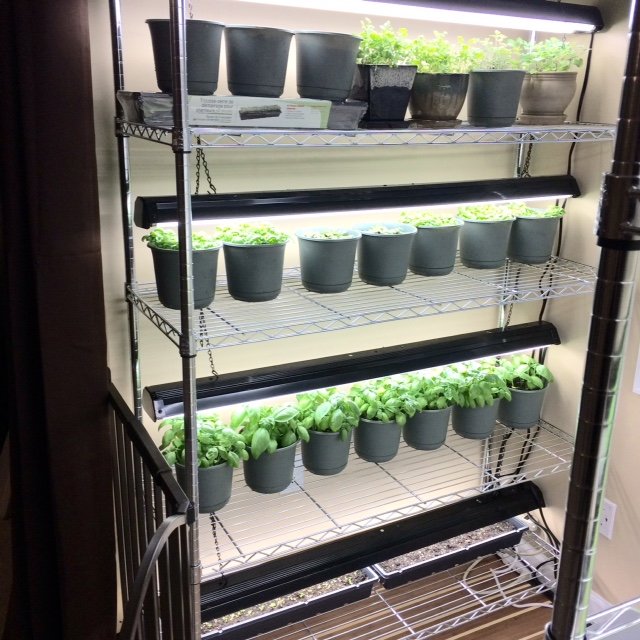 Outdoor garden
 And now that I am home and it is almost the weekend...expect an update!