 I received a wonderful offer today from a dear friend and colleague. A hands-on canning lesson with fresh Blue Lake bush beans from her husband's garden. The photo below captures about half of his very productive garden. He is growing okra, summer squash, beans, broccoli, tomatoes, eggplant, basil and I am sure I am missing at least a few more.
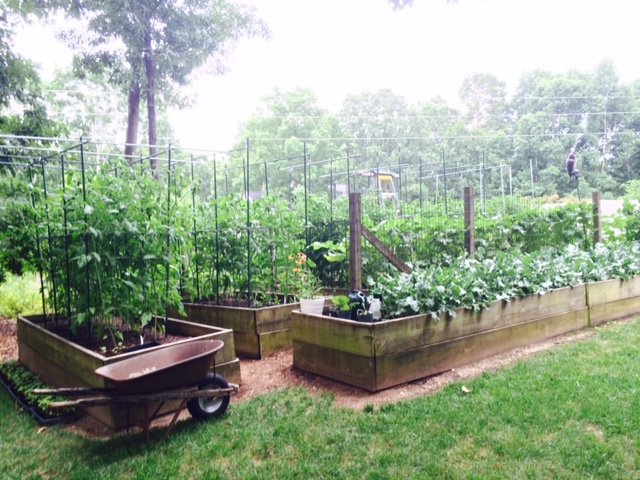 The Ball canning recipe book was open on the island and 6 quarts of beans were cleaned and snapped in a large bowl. We used a colander to submerge a portion of the beans into boiling water for 5 minutes.
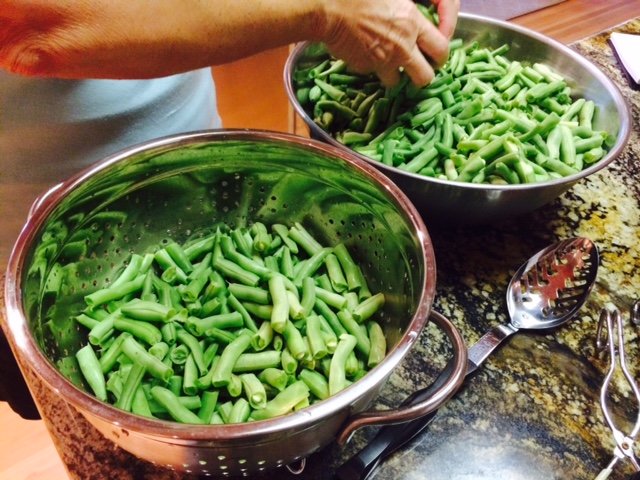 The 1 quart canning jars fresh out of a 180 degree hot water bath are started with 1 tsp. salt before being packed with freshly cooked beans to 1" from the top of the jar. The cooking liquid is then ladled in to the same 1" from the top. Long sticks are used to remove air bubbles by compressing the cooked beans inward from the jar and working all the way around it a couple of times.
 The liquid is topped off to 1" again and the neck of the jar cleaned to prepare it for being sealed.
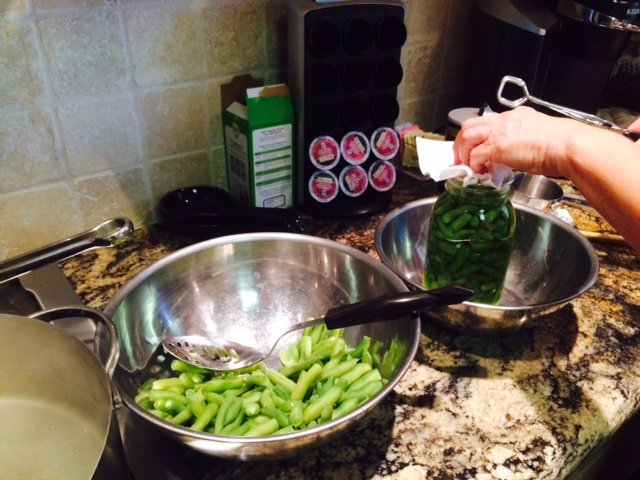 The hot lid is added fresh from the hot water bath (180 degrees) with tongs.
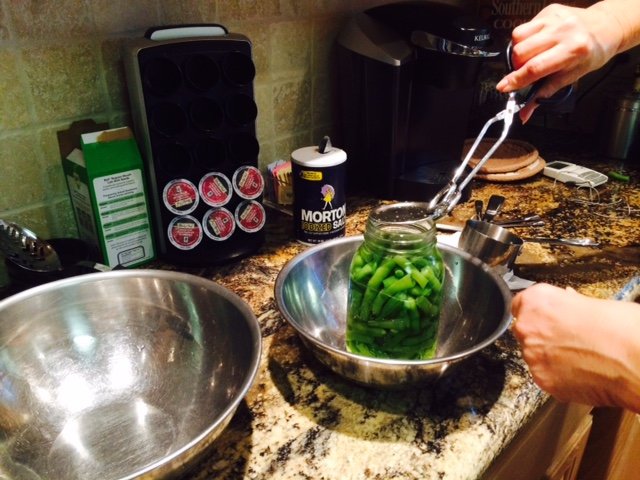 The lids are screwed on hand-tight and jars are packed into the pressure cooker.
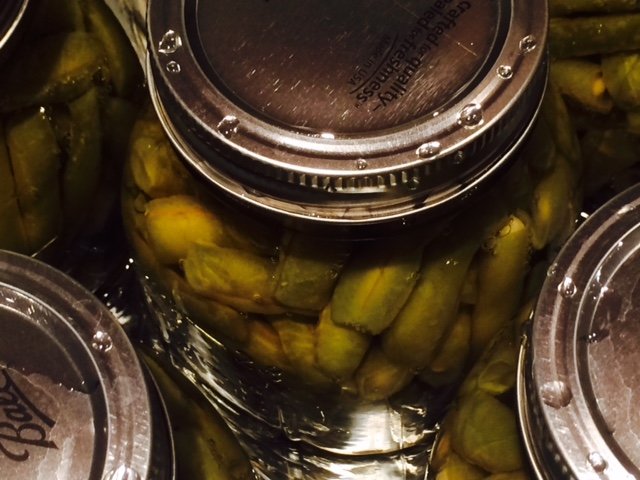
 The recipe instructions for the pressure cooker are very specific. Eventually the pressure reaches 10 lbs and the beans are cooked another 25 minutes.
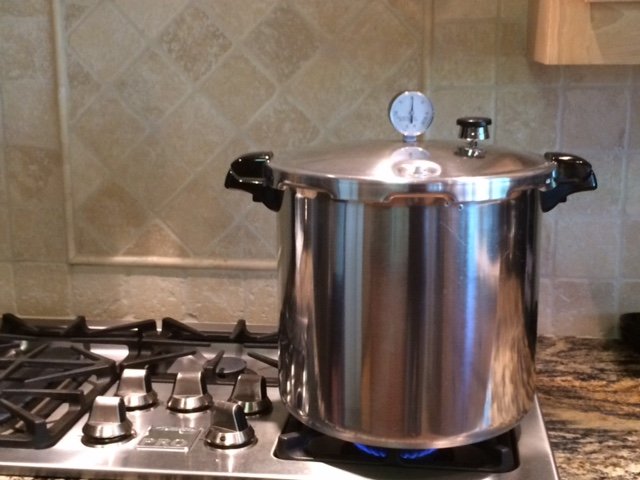 At the end of a couple of hours of wonderful company and conversation and a bit of vino, she had canned green beans and I had more experience and comfort with canning.
 On top of the lesson, she generously shared 2 quarts of the newly canned beans as well as some of their fresh garden bounty. I thanked her by graciously inviting myself to an upcoming tomato canning :)
Early July Update
This morning I started 22 strawberry runners and found another 8 that were already well established in the existing strawberry bed. I began this year with 32 plants and I think I will start 2016 with double the number.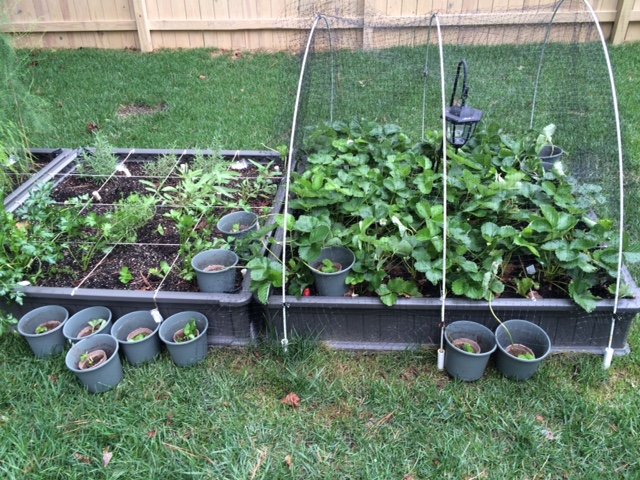 The serrano peppers are being harvested green but I am letting a few go to red also. They are hotter than jalapenos but I think they have a better flavor also.
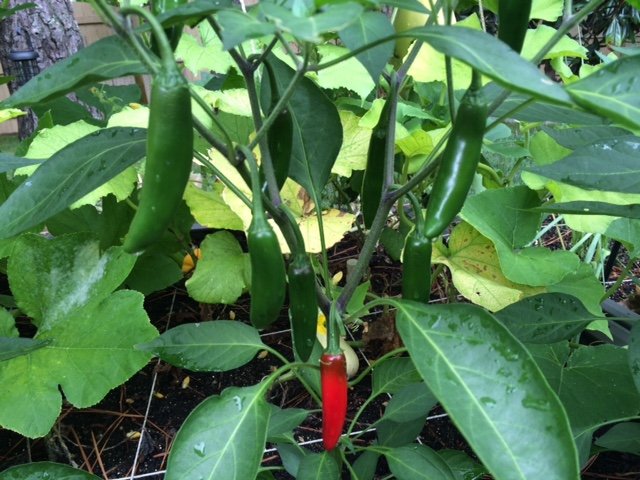 The Blue Beauty heirloom tomatoes are so pretty as their color develops. The bird netting has so far kept all of the slicing and roma tomatoes safe from birds and squirrels. My fingers are crossed that this holds true when they ripen too.
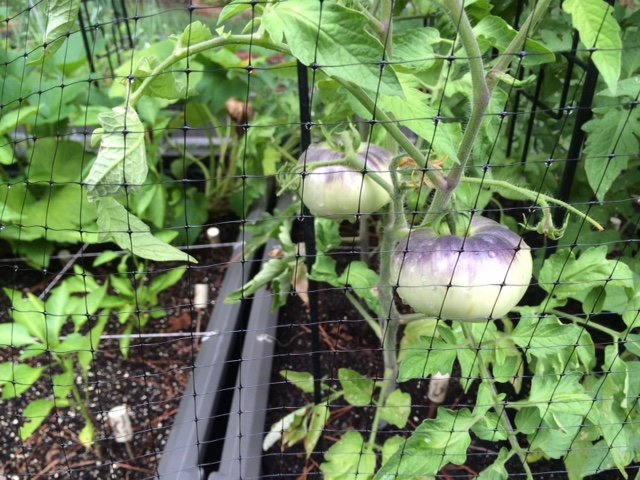 The first year blackberry has sent up one good cane so far which is secured to the trellis and is topped at 6.5' to encourage lateral shoots.
 The edamame is very close to harvest. I will freeze them in serving size vacuum sealed packages and hope to have enough to enjoy them throughout the year until the next harvest.
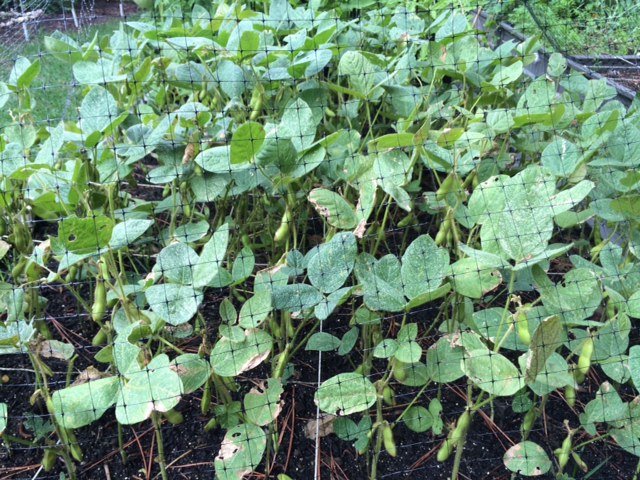 That's the garden update for this overcast and occasionally rainy July 3rd.
Two New Acquaintances
I made two new acquaintances in the garden this week. The first was the American Goldfinch of which the National Audubon Society book says of their call "bright per-chick-o-ree, also rendered as potato-chips", my new favorite bird fact.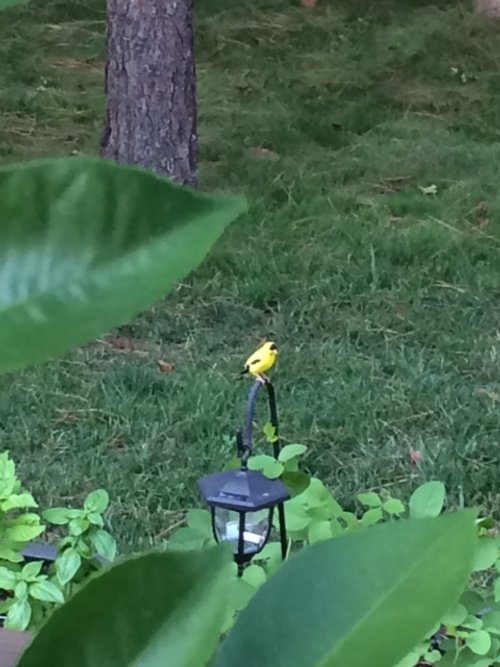 The other new acquaintance this week was not as charismatic as the goldfinch...
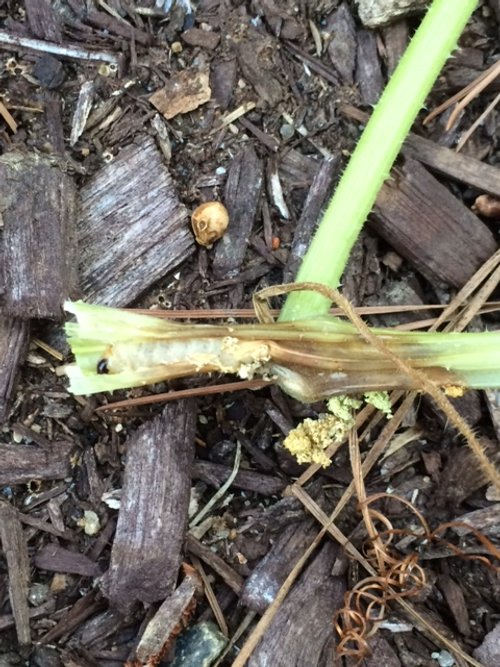 The Squash Vine Borer is the squash killing larvae of the Melitta Curcurbitae moth. As its name indicates, it bores into the hollow stems of squash plants and begins eating the plant from the inside out. Because the pest is hidden with the plant, organic treatments are pretty hands on. The best options are either to perform plant surgery and open up a little of the stem following the bore hole to find and dig out the worm and kill it or, and this will be my preferred method, running a toothpick through the plant stem, skewering and killing the larvae but leaving the plant less damaged than opening a larger hole.Fingers crossed my spaghetti squash makes it though the aggressive acupuncture treatment!
Learn As You Grow
Between now and November the most common phrase in my Google search history will be "when to harvest..." followed by the common name of a first year plant in my garden that is showing signs of being nearly there.In general, operating on a need-to-know-basis with my garden works well for me. A quick search told me that I have some time before my first year spaghetti squash will need to be harvested. But it's not without it's misses too. I mistakenly expected my first year zucchini to continue to grow at something like the rate they did from the 1" to 4" phase. One of the young zucchini shot to 11" and a whopping 1 lbs. in just two days! Researching revealed that I had missed the mark on this one and would need to watch more closely to catch them at the 6"-9" size for the best flavor and texture.
 I do look forward to the day when I have grown my staple cultivars so many times that much of it becomes second nature to me. But I will always experiment a little too, trying new plants and varieties to keep this learn-as-you-grow wonder alive.For the record, my overgrown zucchini was still delicious and I don't think it was just because it was the first one.
A Collaborative Dance
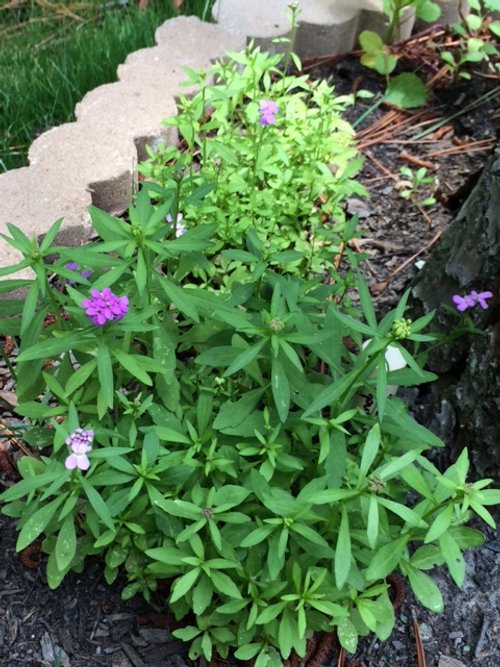
I think of my garden as a collaborative dance with nature and I am always looking for ways to be a better dance partner.My garden is exactly one square foot smaller than the maximum allowed in the HOA rules so I was loathe to use valuable garden space for non-edible plants. Instead I decided to make flower beds around the pines and larger sweet gumballs that occupy the back 1/3 of my yard.When selecting what flowers to grow, I tried to stick with varieties that are native to this area to be low maintenance, have something blooming from spring through fall and hopefully be just like mom's cooking to the wild pollinators.Lucky for me this includes Lily of the Valley and Balsam (below, pink) with Canterbury Bells and Candytuft (below, purple) being naturalized.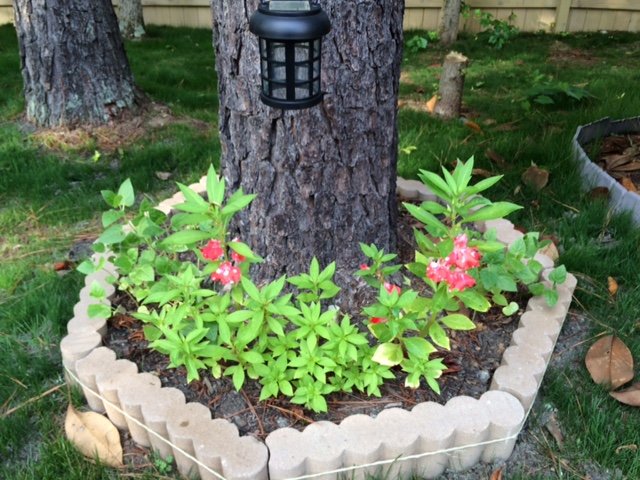
 Despite not being native, I couldn't resist Mother of Pearl Poppys (below) and Four O' Clock Sweets.
 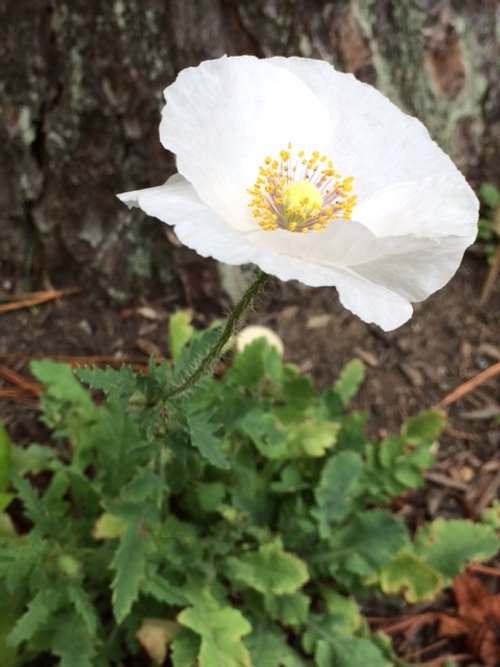 And in spring a colleague gifted me with some pink Calla Lily bulbs.
 I also have a Malope mix, 3 varieties of sunflowers, Blue Zebra Primrose and Zenias growing.I am trying to encourage nature by giving it what it needs, then mostly staying out of the way while it grows delicious food.
Spring Garden to Summer Garden
It is June and the turning from the spring garden to the summer garden is well underway. I am quickly picking the last of my lettuce before it bolts meanwhile the edamame is flowering.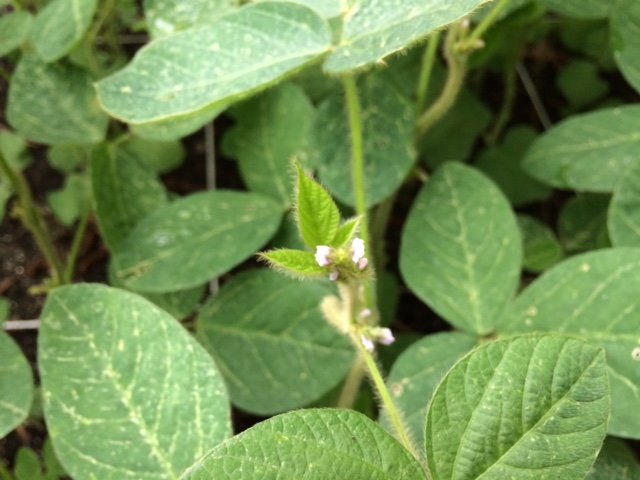 The sugar snap peas, snow peas and strawberries are in full swing while the blueberries are just beginning to take on a purple hue.
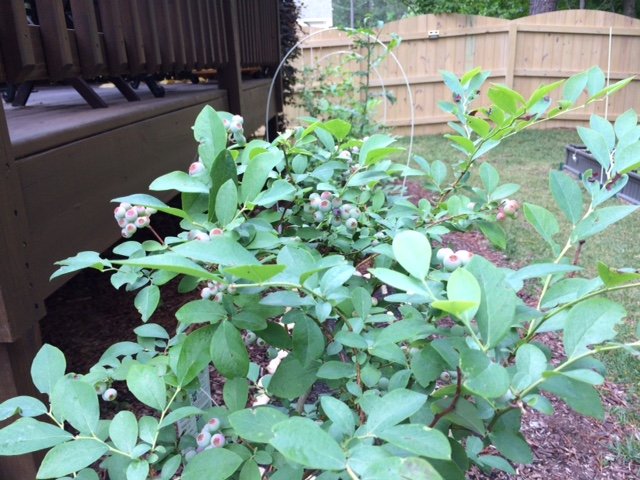 The serrano peppers are fruiting and flowering at the same time.
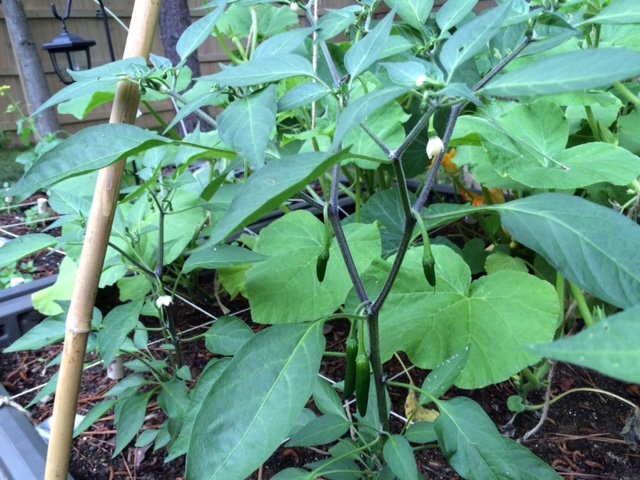 I am pleased with how many spears my first year asparagus crowns are throwing up. The shoots are tall and flopsy when they grow out so they are staked for support during this first unmolested this year. I hope to be able to sample a couple of spears next year and in 2017 they should be healthy, happy crowns I can harvest from.
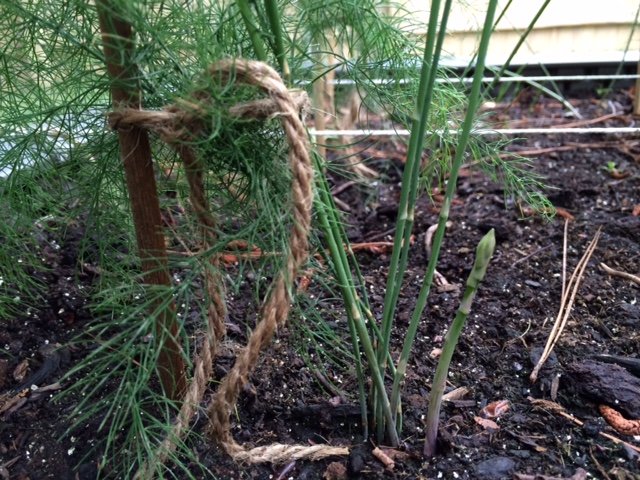 The spaghetti squash have reached the top of the 8' bamboo supports and are making good use of the top bar to spread out.
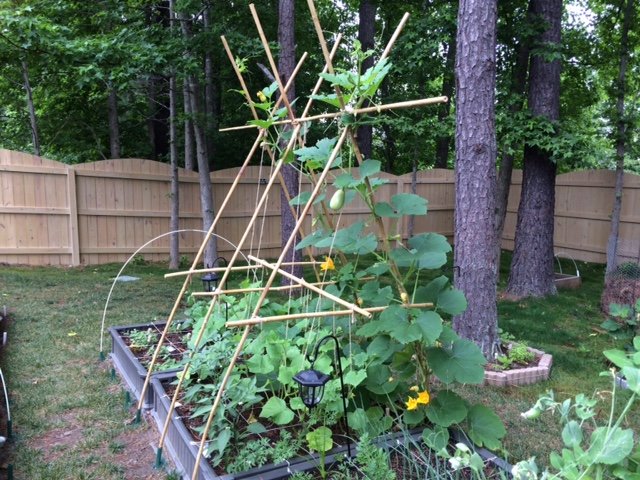 Not pictured:The blackberries are hard, green nubs right now. The pepper plants are flowering as are the zucchini, cucumbers and tomatoes. The chard is getting large and I hope to try stuffed chard leaves soon. The acorn squash is blooming but staying much closer to the ground than the climbing spaghetti.I love this time of year!
Good Companions, Bad Companions
"It is better to travel alone than with a bad companion"~ African ProverbGardening can be as simple or as complex as we chose to make it and the results will echo our intentions. An inclination to grow a few things will result in exactly that, a few things coming up. A desire to grow food will involve a bit more planning, time and effort to consider which items to grow and how best to grow them. A serious intention to grow as much food as possible within the space available on a continual basis will require careful planning, including crop rotations (which I discussed in a previous post), companion planting considerations (which I will discuss here) and strategic succession plantings to create a rolling harvest.Plants are a bit like dinner guests, there are some that seated side by side will find great pleasure in the symbiotic company and will make new friends while others that if placed in close proximity will antagonize each other. This is mostly related to nutrient and root/leaf space needs of different plant families but can also due to how some plants interact with their proximity (ex: alliums exude a chemical that inhibits the growth in legumes).You don't have to hit the botany books to steer clear of the antagonistic relationships or deduce which plants would make good companions - there are plenty of companion planting charts available online ranging from the very simple to the very complex. A little planning will increase your plants happiness and your harvest. Or you could just wing it ;)
Attention - Manufacturers
Have I got an idea for you, a FREE idea! Hydrocortisone infused socks! You already make socks infused with lotion to soften our feet. How about a little something for those of us who are losing the organic battle with chiggers?Chiggers - 2 (feet)Me - 0
A Tisket, A Tasket
A tisket, a tasket, sandwich greens in my basket!Tonight's dinner shopping spree in the garden was for accouterments for egg salad sandwiches. Clockwise starting at the bottom is some spinach that is on the verge of bolting in this warm weather, some lola rosa lettuce, cilantro and those olive green sprigs at the 3 o'clock position are sweet pea shoots (trimmed from the growing tips of my producing plants) which add a light, sweet pea taste to any sandwich, salad or stir-fry. In the center are leek thinnings which I use like scallions and add a lightly onion taste to dishes.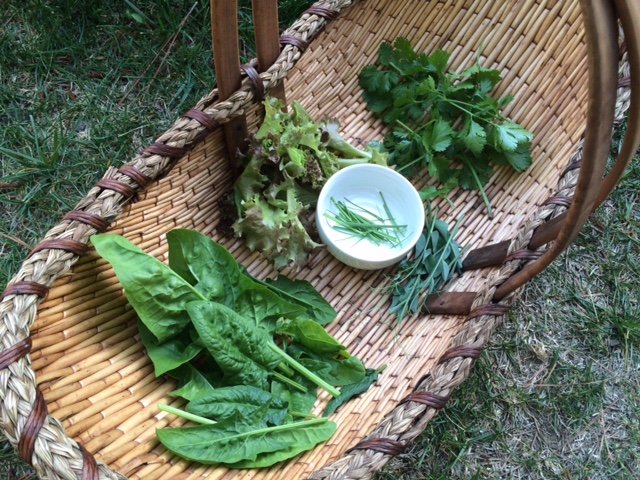 If you to garden but don't want to dine on salads nightly, I agree wholeheartedly and suggest we make a nice sandwich instead!
One Man's Trash is Another Man's Haute Cuisine
In the past couple of years microgreens have become a buzzword on restaurant menus and news articles talking about their nutritional content compared to the mature varieties of the same plant. Some early studies show that there may be reason to laud their nutritional content and chef's put them on their menus because they are delicious to the eye and the taste buds.I grow a number of indoor microgreens (basil, cilantro, mustard, arugula, beets) to add color, flavor and crunch to dishes but you don't have to set up a grow area to get some microgreens in your diet, you can just repurpose your plant thinnings.This year I overseeded my regular and dwarf varieties of pak choy and basil in my backyard garden because I was using 3 year old seeds and suspected that I would have low germination rates. Surprise, the seeds germinated at a remarkable rate and now I have a whole lot of extra seedlings that will have to be removed to make room for the vigorous individuals to grow to maturity. Rather than cut them and toss them in the compost, I let edible seedlings grow enough to be used as microgreens before snipping them down.Below you can see that I thinned one square of the dwarf pak choy that will be used as microgreens today and I will save thinning the square next to it until I can use them in a meal. Waste not, want not!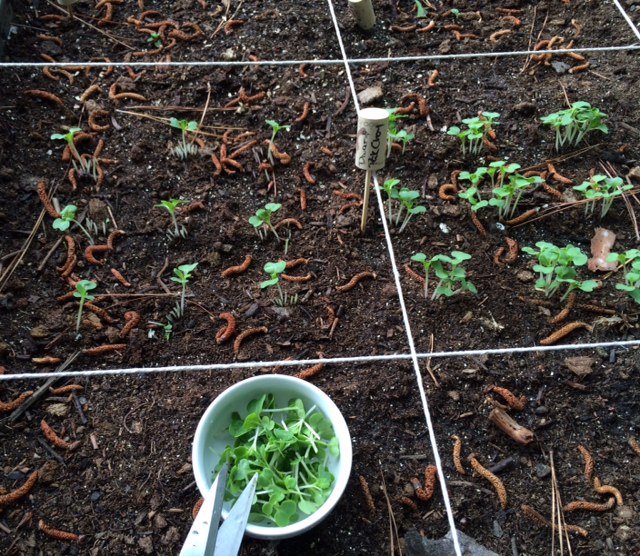 Whether you are just thinning seedlings or clipping microgreens to go into your next meal, be sure to use scissors or a similar sharp pruner to cut the plants at soil level. If you pull on your thinnings, you may damage the delicate roots of the one you have selected to grow to maturity.
Getting The Most From Your Harvest
For urban growers, getting the most production out of the smallest space possible is an absolute priority! I can grow a lot in my 224 sq ft space, but there are ways of making what you grow give you even more.One of my favorite methods of getting more is to harvest leaves, but allow the plant to regenerate and keep growing more leaves. Not all garden plants are suitable to this, but if it is an herb or vegetable you grow for the leaves, chances are that you can.Some of my favorite plants to steal from are cilantro, chard, spinach, lettuce, basil, oregano, rosemary, sage, thyme and parsley and you can do this even when they are quite young. The trick is to only steal a little from each plant so the plant can recover and continue to grow.Below are my young cilantro plants. I choose the largest, oldest leaves from furthest down the plant stem to leave the fresh young growth undisturbed and pinch off one or two from each plant or as much as is needed for a meal.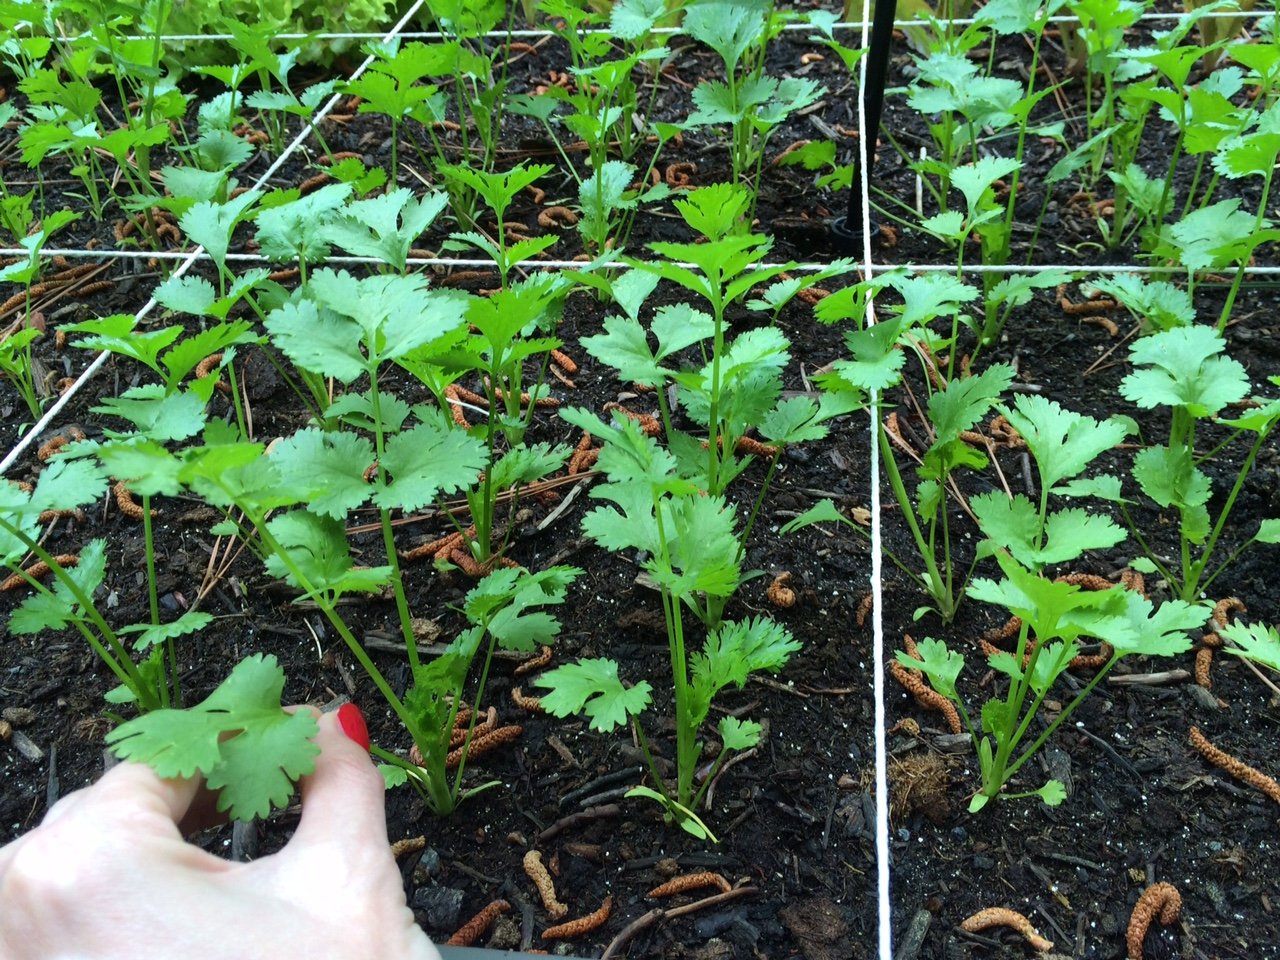 The spinach is more mature but I still want to keep the plants growing and only harvest what I need right before a meal.
 There is nothing fresher than still warm from the sun or wet from the rain.
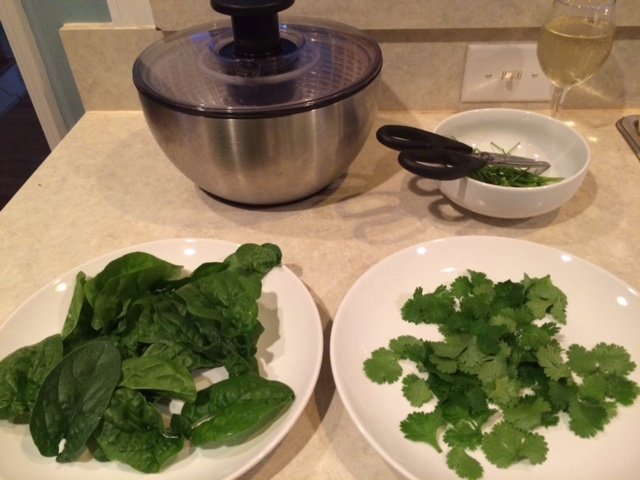 Who says you can't have your plants and eat them too :)*Note - even those little cilantro and spinach stems will be put to good use either as flavorings for stocks or to into the compost.
Extensive Gardening
If you are not familiar with the terms extensive and intensive, they can be a bit misleading. Extensive doesn't mean large, it means requiring little or no additional inputs (fertilizer, compost, labor, etc.) and intensive doesn't mean working hard, it means using a lot of those same inputs. A great primer on the differences can be found here.For my initial garden set up, it was intensive. I purchased the raised beds, the materials to make soil (compost, vermiculite and peat moss) and seeds. But once it is set up, I was able to become much more extensive. I save seeds, any part of the plants that do not end up on a dinner plate go into the compost to feed the next generation, seedlings that need to be thinned have those same two options - food or compost, or as my son says "the circle of life".I still have water as a major input when the skies aren't doing the watering for me and I still have to buy some seed, but otherwise it is a pretty closed cycle with most of what my garden needs coming from my garden and yard. I have looked into the rain barrel collection options but I am not convinced that water that has run off a petroleum based shingle roof is a good idea for growing my food.In the meantime, more and more people like me, who have a generational disconnect from the conventional farming ways of our grandparents and great-grandparents are taking up farming and urban farming. With this new generation of growers we are seeing an entirely new set of best practices and innovative ideas. Maybe someday soon I will be able to have a completely closed system.
Full Spring Ahead
This morning the blueberry bushes were loaded with plumping berries,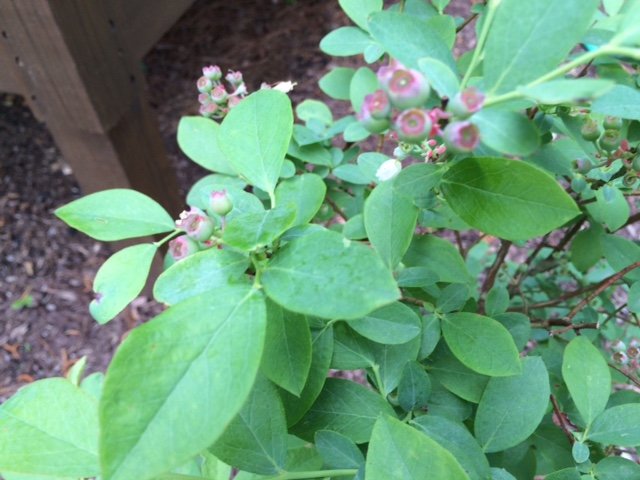 as well as a new crop of blooms.
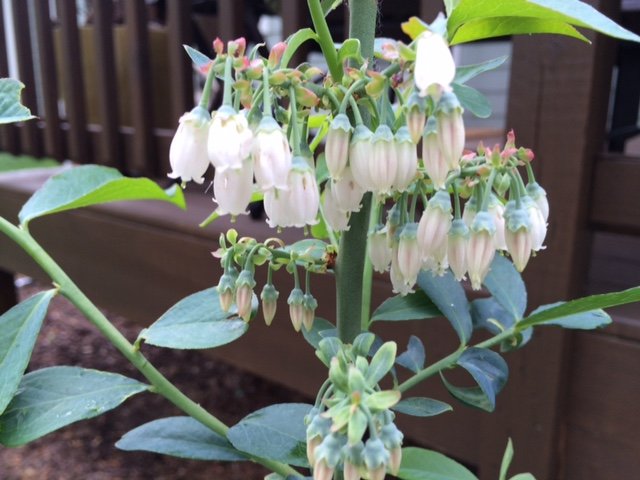 The beds are looking more green than brown with each passing day.
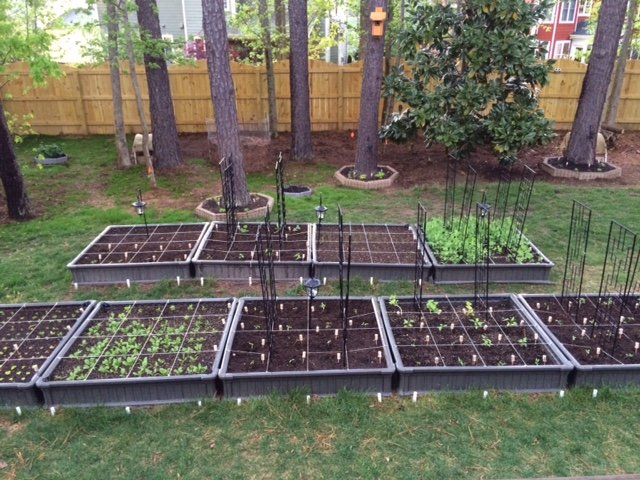 This afternoon the rain is the gardener so I am catching up on indoor projects. I started my first Elm Oyster Kit experimenting with a cloche instead of the humidity tent that comes with the kit. I really liked the Shiitake Blocks and plan to do them again soon but I wanted to learn more about the Elm Oysters because they are a forage mushroom in NC.
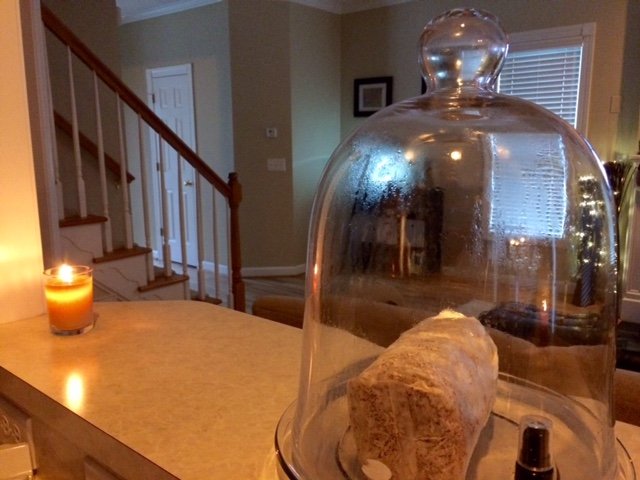
Rotation Reboot
Denial ain't just a river in Egypt - true in my Midwestern youth and true today.Last week I accidentally* ordered 4 additional garden beds instead of the 2 strictly required for my 2015 garden plan. Today, with extra garden beds waiting in the garage and a snow day in the Triangle at hand, I sat down to consider what to do about the 32 square feet of extra planting space I accidentally* acquired. As I considered whether to add new plants, expand the number of my current varieties or a combination of both, I kept thinking of this article I had run across a couple of weeks ago about crop rotation.Until now, I have done a pretty good job of refuting the quiet voice in the back of my mind talking about crop rotation with arguments like "I add compost regularly to my raised beds, so I am replacing the lost nutrients" and "my scale is to small to worry about crop rotation, and that is for monocultures anyway", but as I sat here today looking at what I had already planned and what I was planning to expand, it became harder and harder to not be a responsible steward of the soil I have made and hope to nourish my family with.At the same time I am garden planning, I am enjoying the Edible Education classes on youtube about the future of agriculture, arable land and food in America and the world.So back to the article for tips on rotations and my garden plan I went. My garden was not entirely hodgepodge, there was some method to my madness! I have a north facing backyard despite my strong preferences and best efforts when house hunting last summer, but if you can't be with the one you love, love the one you're with! So all the tall plants were planned for the back of the garden so they weren't casting shade on anyone behind them and the ones that need more sunlight hours were placed to the right of the garden which has more daylight hours before being shaded by my south facing house. Beyond those two considerations though, it probably was a bit of a hodgepodge.I started with color coding my planned plants according to the 4 main categories (leaves, fruits, roots and legumes) to see where I was - which was all over the place, then reorganized their placement into a more cohesive plan. I started at the left with the leaves and worked my way right to legumes with the idea that everything will shift to the right for 2016 and so on. I don't currently have an equal number of boxes devoted to the roots and legumes as I do for the leaves and fruits to make this work perfectly, but I am hoping that ending my denial and admitting I have a rotation problem is the first step in solving it.And since I was at it with color coding plant "types" on my Excel spreadsheet, I thought I might as well include the container plantings I had planned, the non-rotational plants (asparagus, some herbs and strawberries) I will have off-set from the Garden Proper and the Morel boxes I have in the tree line at the back of my property. And since I was going to include those, I may as well include a code for my preferred preservation techniques for each type... The red arrows are where trellis supports will be, and the 3 beds in blue will be off to the side and will not rotate from year to year. I think it is entirely likely that more beds will be added for 2016 and an effort will be made to utilize them for roots and legumes so I end up with a roughly even number for each overall type so the rotations work more uniformly.I plan to grow a handful of flower varieties with as many natives as possible to serve the local pollinators, but since I will not be eating them, I am comfortable putting them directly in the yard and not taking up precious garden space with them. Additionally I have my 5 blueberry plants, 4 fig trees (2 in the ground and 2 in containers), my Meyer Lemon and an indoor Bay Laurel.All in all, 2015 is shaping up to be a great year to grow and I am considering alternate irrigation sources now that I have cut Denial out of my garden plan.*tell me your definition of accident and I will tell you mine
New Beginnings
The groundhog has come out of his hole to do his evil once again this year and after few minutes spent researching his predictions (hint - he pretty much always sees his shadow and his accuracy is debatable) I got down to the real business of early February - seeds!My 2015 garden as it exists on paper and in seed packets, has already expanded over previous years' in terms of both square footage and vegetables to be grown. It may expand a bit more before the daffodils raise their heads and announce the official start of Gardener's Spring.I have been busily recycling the newspapers left in my driveway and on the office breakroom table for months into folded newspaper seed pots in preparation for this first full week of February.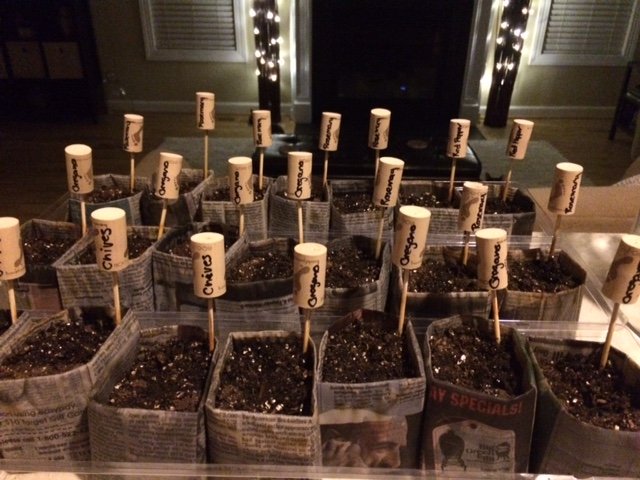
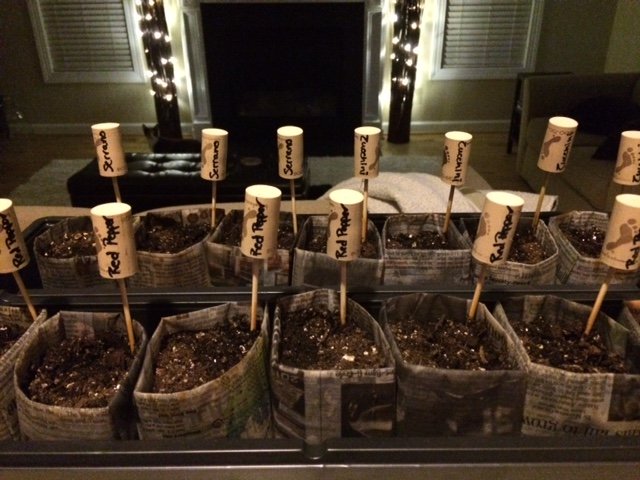 I would also like to that all those generous people that donated used wine corks for my plant markers ;)
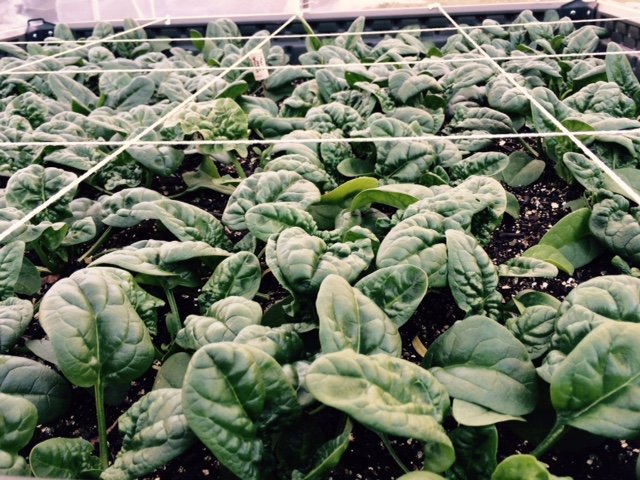
December Greens
Collards and spinach may not qualify as Christmas Miracles in most circles, but having fresh, green produce right outside of your back door that is pest-free due to the season is not entirely unlike a miracle in winter.
 Merry, Merry!
Garden Planning
I spent the morning planning and drafting out my 2015 garden in Excel, compromising on the amount of 'This' on my spreadsheet so I can grow a little more of 'That' in my limited space. I can grown an awful lot of food in my 9 4x4 intensive raised beds, but because of the simplicity of the math, I am also keenly aware of just how many square feet of space I have available to me and the limitations of such.I have learned over the past couple of years that if I already have my garden laid out in advance of looking at seed catalogs, it will help curtail the impulse to try out some of the wonderful, colorful temptations on offer. In order to add anything new to my carefully planned square footage, something else must be eliminated to make room for it.Before you think I am the most self-disciplined and focused gardener you have ever heard of, know that I also have a habit of saying 'well, I could make a little 2x2 box separate from the garden proper and try it over there...'. I have done this with morel mushrooms, some perennial herbs, strawberries and asparagus.In the meantime, the 'best laid plans' for 2015:
Fall Garden
Being a newcomer to the south, I like the idea of incorporating a whole new list of historically normal and place-centric foods into my garden and menus. I read this great article in Urban Farm magazine a few months ago that seeded the idea of growing collards. This was perfect timing since I was purchasing a house in late July making my 2014 garden and harvest options limited due to a shortened outdoor growing season for this first year.Collards are one of the southern foods that did not make their way into my rural, Midwestern childhood the way that fried okra, catfish and frog legs did. My only experiences to date have been at restaurants in and around the Raleigh area with mixed results. One of the reasons the article and the idea of growing my own collards appealed to me was the opening part about them being often overcooked, which I would say is true of every dish of collards I have had so far. I also believe that the time from harvesting until it is on the plate makes a difference no matter what kind of food we are talking about, so the idea of fresh collards hopefully cooked to perfection is one I am looking forward to.With my limited time frame, I have planted 16 dwarf collards (another 16 just last week and I am waiting to see if they germinate) and 144 spinach plants (2 varieties) in my outdoor garden. I am still looking at options for additional cold weather plants but feeling pretty good about what I have growing considering my time and weather constraints for this year.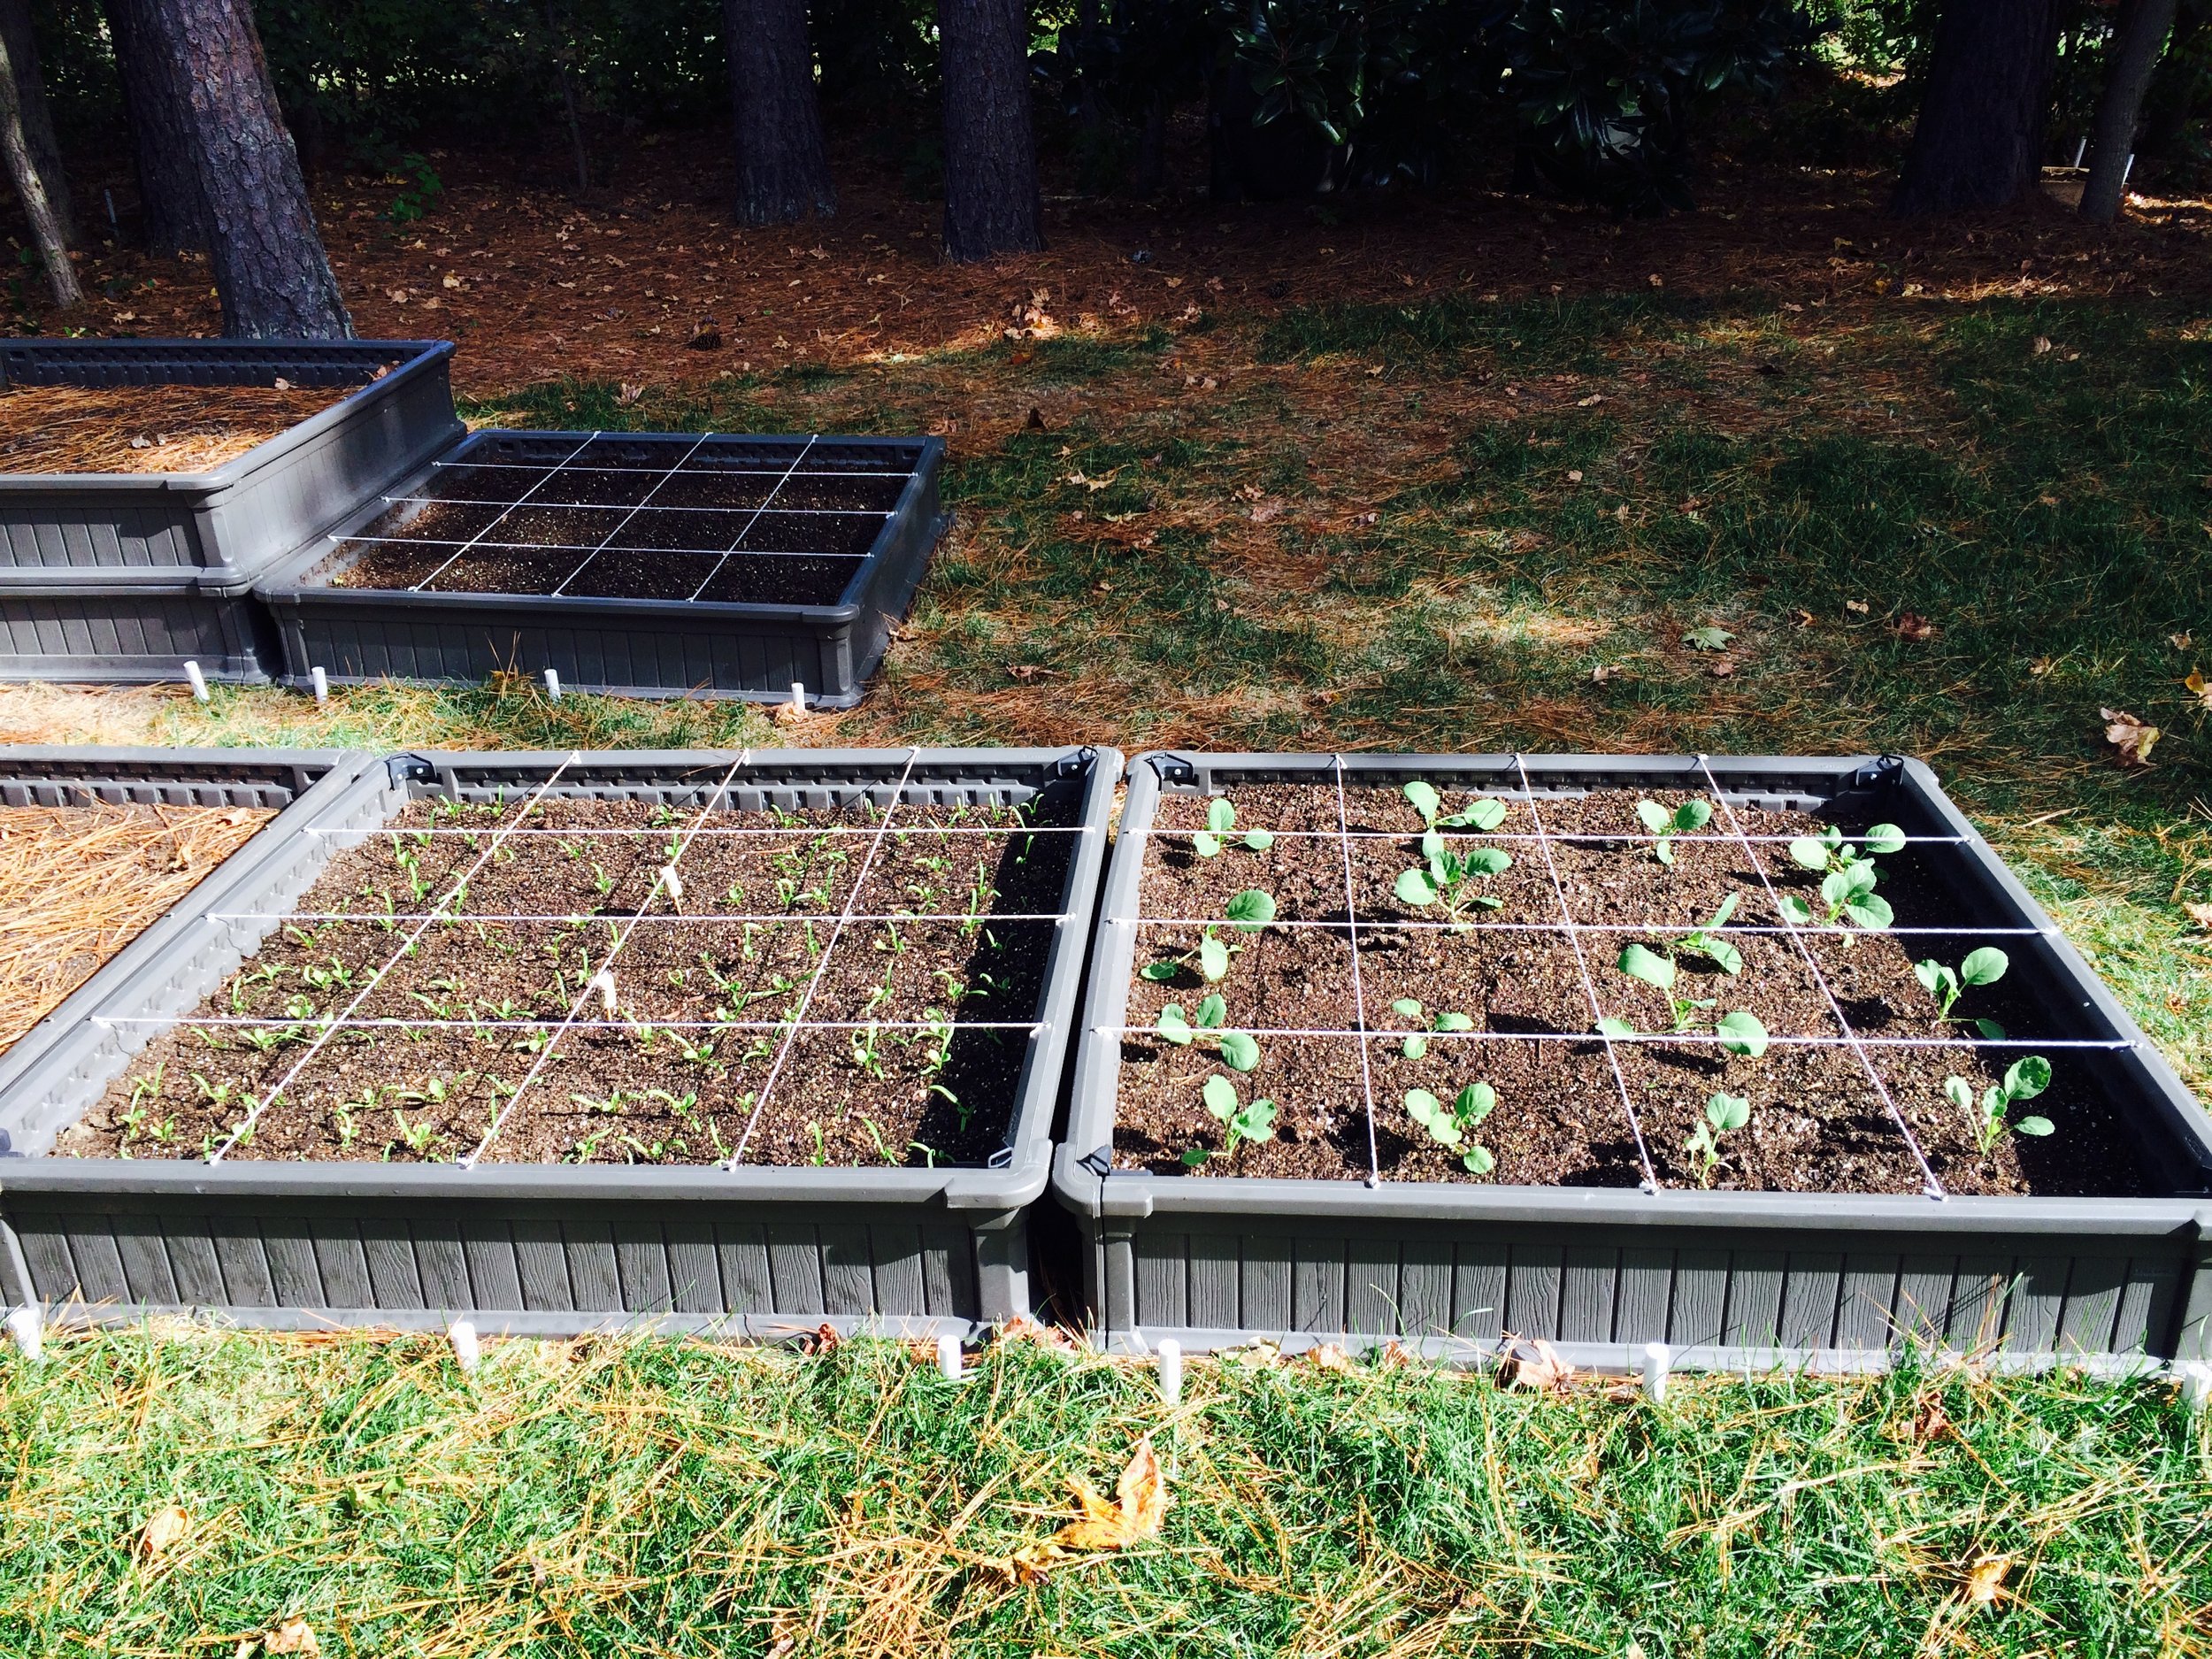
The Great Indoors
The leaves are turning, the mornings are a bit crisper and all of the big box stores have hauled out their Christmas items....that can mean only one thing - its time for NHG to head indoors!As I sifted through listings looking for my Raleigh area home, the garden potential of the backyard and the indoor gardening space were priorities. I use intensive, raised bed gardening outdoors so I can grow a lot in a little space outdoors and the same is true indoors. I have set up in my indoor garden in a dormer nook in my bonus room that measures 48" deep by 74" wide. I have two 4' x 18" chrome finished utility shelves equipped with shop light fixtures to grow my herbs and tender greens. My indoor garden is great in summer months to grow lettuce and spinach that cannot tolerate the summer heat but it really comes into its own during the winter when it serves as my main source of fresh herbs and greens. What I have growing so far are:
- 13 Genovese Basils
- 3 Cilantros
- 1 Oregano
- 1 Mint (on consignment for my neighbor who wants it for a Kentucky Derby party next year)
- 4 Rosemarys
- 2 Garlic Chives
- 2 Leaf Lettuce varieties
- Basil and Cilantro microgreens
I will light up additional shelves as the season wears on to add more lettuces and more microgreens (I love arugula and mustard for salad and sandwiches) but this is the official start of the off-season garden.
How Does My Garden Grow - Part 2
In mid December the indoor garden was really taking shape. The lettuce was doing great and providing a couple of salads a week, the spinach was coming along and the 3 basil plants I purchased from Wild Family Farm over the summer were looking seriously picked over due to my insatiable appetite for fresh basil on almost every meal.And then everything changed.On a shopping trip to Green Acres I spied some potted basil plants from a local greenhouse. I picked two of the most likely plants and congratulated ourselves on giving my basils at home a well earned rest and recoup. I took the new basils home and introduced them to my garden not knowing they were carrying aphids. Very healthy, fecund aphids.About a week later the aphid infestation became apparent. They engulfed the spinach, the swiss chard, the lettuce, the basils and even the kale! The only plants that were safe were the oregano, rosemary and chives.Prior to the introduction of the new basil plants, I essentially had a sterile environment. The previous owner had not had a single houseplant, and before my indoor garden, neither did I. After discovering the invasion, I quickly researched my opponent and learned that aphids are the bane of gardeners everywhere. I researched treatments methods that are considered organic and headed to the local Menard's. The first line of defense was Neem. I followed the instructions and made sure to get the undersides of leaves where aphids like to hang out. I used it for two weeks as directed and it reduced the aphid population, but then they rebounded again. I moved down the list and made a second attempt with a pyrethrin mix with the same results, an initial reduction in aphid population followed by a resurgence.Despite two disappointing experiences, I still wanted to stay organic if possible and decided it was time to try diatomaceous earth. Everything I read said this stuff would prove lethal not only to the aphid population, but also to any spiders, soft bodied flies or other insects that wondered too close. I coated all of the plants including the ones the aphids were avoiding. I coated the tops of the leaves, the undersides of the leaves, the top of the soil mix, I coated everything! Three weeks later all I had to show for this was dusty aphids.I had three choices at this point; go with some serious chemicals that would keep me out of the organic club, put all of my inside plants outside and let winter kill the aphids and the plants and try again in a month or so when I could be sure that all the aphids were gone or natural predators. I opted for the natural predator route with the caveat that if this didn't work, I was going to kill everything and start over. I ordered the ladybugs from a company with good reviews and 1,600 squirming ladybugs arrived a few days later.
 (ladybugs walking on the Merveille des Quatre Saisons lettuce)
I released the ladybugs on all of the plants and waited. One day later the aphid population was scarce. Two days later I could not find an aphid anywhere! It has been two weeks now and the ladybug population is down to maybe 150, but still no aphids to be found. I have a suspicion that there are aphid eggs waiting to hatch, but also a hunch that the ladybugs may have pulled off the same trick due to the difficulty I had trying to take a photo that didn't include mating ladybugs! So I have high hopes that if there is a round of aphid hatchlings in my future, there will also a be a resurgence of the ladybug population around the same time.
 (ladybug on the Amish Deer Tongue lettuce)